Tomb Raider 1 Gold: Unfinished Business Walkthrough & Game Guide
Level 1: Return to Egypt
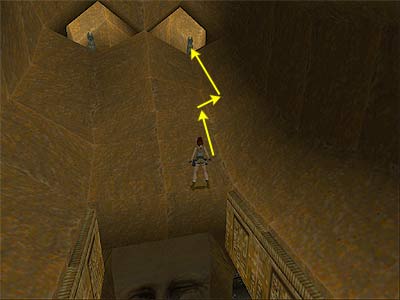
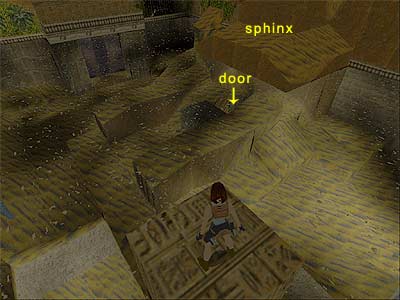
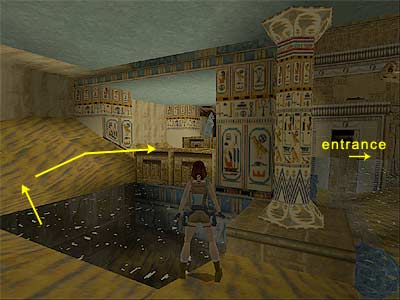
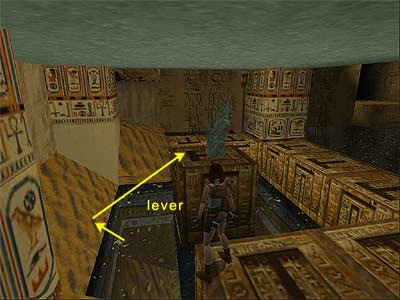
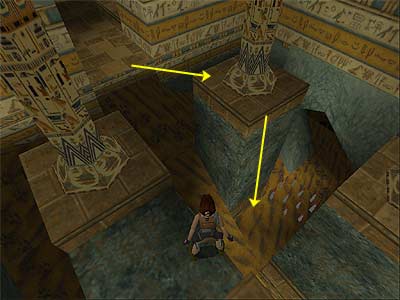
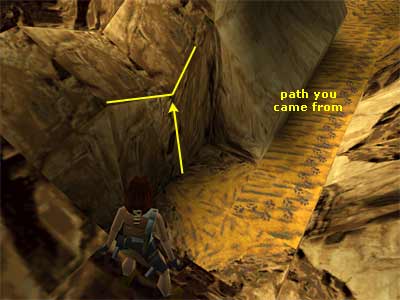
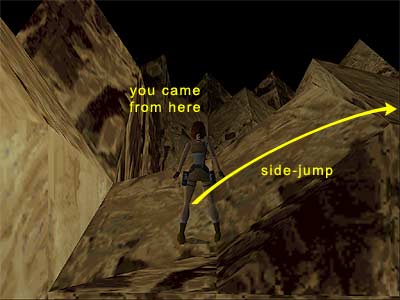
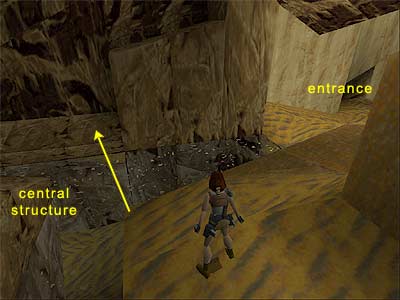
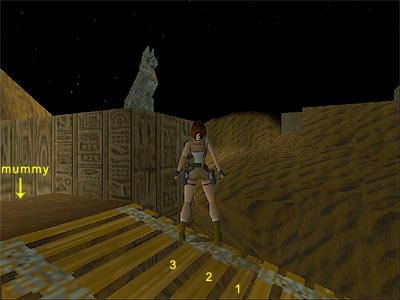
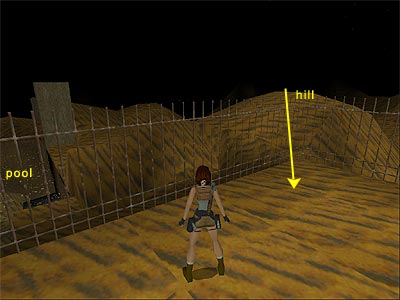
The level begins with Lara sliding into an alcove above a double gold trapdoor. Proceed ahead and the trapdoors will open and the openings that contain cat statues on the other side will light up. Take a running jump above the trapdoors (without pressing Action) to land on the opposite side. Vault onto the right slopped part, move to the right and take a standing jump into the right hand opening (as shown here). Drop into the room with the two cat statues and pick up the Large Medi Pack. If you climb on the left block, you will get a glimpse of a room with pool and pillars elsewhere. Jump into either opening and slide down, above the trapdoors. Drop through the trapdoors and into the pool below. Quickly swim ahead and to the right, where you can climb out of the water. Draw pistols, turn around and kill the crocodile. For the least damage, stand on the right hand side of the trapdoors and take a running jump (towards the start of the level) to drop into the pool. That way, you will reach the sandy ledge quicker. Once the crocodile is dead, take a look around and you will recognize the place. It is Khamoon from the original game. Turn to face south and take a running jump towards the opposite ledge. Surface and quickly climb out of the water. A crocodile has already reached the place, so draw weapons and kill it. Pick up the Small Medi Pack and the Magnum Clips. A second crocodile will soon join if you wait for a bit. If it does not show up, swim close where you got the Medi Pack. Swim through the opening the crocodiles came from and get the Shotgun Shells. Return back and climb out of the water, using the sandy ledge on the north side. Flooded area with Sphinx and Obelisk - Jump into the main pool and swim to the right side of the Sphinx. Climb on its shoulder and go to the back-side of the Sphinx, where you will find some Shotgun Shells. Jump into the water again and swim to the bottom of the Obelisk to get two sets of Magnum Clips. Surface and climb out of the water, using the ledge close to the fence. When you do that, you will hear a panther growling in the next area. Kill it by shooting through the small opening or the fence (or wait until later). Turn to face the Obelisk and take a running jump onto it. Pick up the Magnum Clips. 1st Secret - When you land on the Obelisk, the camera shows you a door opening. This door is beneath the Sphinx and behind a movable block that you cannot push, because it is underwater (see this screenshot). The door in on a timer, but the countdown does not start, as long as you do not step off the Obelisk. So, walk up to the front right corner and take a running jump towards the movable block. Swim through the opening and the door you just opened. Follow the underwater tunnel, until you reach the secret room (you will hear the chime signaling the Secret). A crocodile attacks, so swim back to the main pool and climb out of the water using one of the various ledges. Kill the crocodile and swim to the secret room. Get the Small Medi Pack and the two sets of Shotgun Shells. Then return back close to the Obelisk. Flooded area with pillars - Swim through the opening to the left of the Obelisk and follow the underwater tunnel. You reach an area with some pillars at the far side (it is the area that the camera showed you almost at the beginning of the level). Swim there and climb out of the water. Draw pistols and kill the crocodile. Then jump into the water again and get the Shotgun Shells next to the boulder. Locate the opening in the wall on the east side (to the left of the entrance) and climb into. A panther lurks here (or two if you did not kill the one before), so stay at the entrance and shoot it. If it approaches, jump back into the water and climb into the opening again. Keep shooting and do the same until the panther is dead. Inside the room you will find a Small Medi Pack and some Shotgun Shells. Exit to the sandy platform through the opening on the right, and pick up some more Shotgun Shells and the Shotgun. Go to the other side of the platform and jump into the pool. Pool with cat statue - Swim close to the pillars and climb out of the water, using one of the sandy ledges. Jump to the gold blocks that surround the cat statue, then to the block in front of the statue (see this screenshot if you are not sure where you need to climb). From here you can kill three panthers that lurk on the ledges at the top of the room. You are not going up there, so take care of them if you want all the kills. Jump into the small pool with the cat statue and pull the underwater lever to open the door behind the pillars. To get out, climb on the slope behind the statue and press Jump to back-flip on the block with the statue (as shown here). Jump to the gold blocks on the west side, then to the sandy ledges. Go around them to reach the door you just opened. Go through it to reach a dark room with pillars. Pass this room and enter the next lighted room with pillars. Do not stop, because a panther is coming from behind. When you reach the doorway of the next room, jump to the either left or right hand block with pillar. Turn around and kill the panther. If it leaves and does not come back, jump to the doorway with Action, draw weapons (without turning left or right) and shoot the panther when it appears. If it approaches, back-flip to the pillar again. Once it is dead, jump to the left pillar. There is a part of the ground without spikes, between this and the pillar on the west (as shown here). Drop there and walk through the spikes to reach a dark passage. 2nd Secret - Here go to the right and follow the passage to the end. When Lara stops, climb on the ledge ahead. Be careful here, because there is a spiked pit beyond. Walk up to the edge and take a staning jump with Action. That way you will grab a ledge above the spiked pit. Pull up and again proceed carefully. There is a second spiked pit ahead. Angle Lara a bit to the right and jump to the opening. Drop down, and jump over the third spiked pit. A door on the right opens, so climb through it to reach the secret room. Pick up the two Shotgun Shells, the Large Medi Pack and the Magnum Clips. The door on the other side opens as you approach. Go through it and jump to one of the two pillars on the right. Drop onto the safe spot, as you did before, walk through the spikes and enter the dark passage. This time go to the left to reach a sandy area. Turn right and again right to reach a path. As you pass through it, the cat statue at the top ahead transforms into a panther. Go to the end of the path and turn right to face the rocks. Climb on them and kill the panther (see this screenshot if you are not sure where to climb). Then jump to the rocks where the panther was and go through the opening on the left. A boulder will fall from above. Take a running jump above the gap to land on the opposite side. Go up the steps around to the right to reach an opening. Carefully, drop to the block below and pick up the Shotgun Shells (or the Shotgun if you do not have it). 3rd Secret - Climb back into the opening and turn around. The spot you just got the Shells should be exactly below you. Take a running jump to grab the rocky ledge ahead and pull up. Proceed a bit ahead and take a look on the left to spot the Shotgun Shells (or the Shotgun if you do not have it) on the ledge. This is where you need to go and there are two ways: • Turn to face the way you came and back up as much as you can. Then side-step to the right as much as you can (position Lara as shown here). Side-flip to the right and Lara will land on a slope. Press Action to grab the edge and traverse to the right in order to pull onto the flat ledge. • Having the way you came to your back, turn left and back up to the rocks. Take a running jump with no Action to land directly on the flat ledge. In case Lara lands on the slope and slide backwards, press Action to grab the edge and shimmy to the right. Then pull onto the flat ledge. Turn around and take a running jump to land on the ledge with the Shells. Pick them up and hang from the front side. Drop onto the ledge below, losing a small percentage of health. Make you way down to the path and return back. With the path to your back, go to the right to reach an area with spikes. Before going through them, equip the Shotgun. As you pass through the spikes, a panther will emerge from the cave beyond. Kill it before it damages you. Pick up the Shotgun Shells from the sandy ledge on the right and some more beyond the spikes. Then walk back and through the spikes. Pool with wooden bridges - Pull the first movable block and go behind it. Push the second movable block twice to open your way. Follow the passage to a pool. A panther lurks on the other side, so kill it from here if you want. Then jump to the small island with the pedestal. Another panther attacks here, so either jump back to the ledge you came from or climb on the pedestal. When the panther is history, pick up the Gold Key. When you do that, the camera pans back and shows a cat statue, giving you a clue of where you need to go. If you did not kill the first panther before, do it from here. Go to the southwest corner of the island and take a running jump to the rocky ledge beneath the bridge (as shown here). This will alert one of the two crocodiles in the water. Kill it and jump to the central structure. Go around to the right and jump on the bridge. For now, go to the left. This will alert the second crocodile. Kill it and proceed to the cave where the first panther appeared. Inside you will find a Small Medi Pack. Pick it up, exit the cave and drop into the water. Get the Magnum Clips from the northeast corner. Swim to the west side. Locate the opening to the left side of the silver gate and swim through it. Follow the tunnel which will get you to another room. Climb out of the water and quickly climb on the platform ahead. Two crocodiles will emerge from their hive, so take care of them. Pick up a pair of Magnums and some Clips and drop onto the ground. When you get the Small Medi Pack, two more crocodiles come from their hive, so climb on the platform again and kill them. There is one more crocodile in the water, so be alerted. Either climb out of the water of this area or swim back to the pool with the wooden bridges and climb on one of the various ledges. Prefer the one in the southwest corner, which is close to the bridge. Top of the bridges - Jump on the bridge and start going up. When you reach the top (with the rocks) turn around and jump up to grab the ledge above. Pull up and turn around. Here you can go to the right or straight ahead. For now, jump to the ledge ahead and vault on the next ledge. Climb up the next two blocks (ignore the slope on your right) and go around the pillar, where you will find a Large Medi Pack. Get it and return back to the slope you ignored before. Dark cave with crcodiles - The slope takes you to a dark cave with two crocodiles. It is the hive from where they were coming out before. There is nothing else apart from these, so do not bother if you are not interested in all kills (return back and jump to the opening on the left - skip to the next paragraph). It is pretty dark down there, so if you want to deal with them quickly, equip your Shotgun. Also, make sure that you slide down the slope backwards, otherwise you will lose some health. Once you drop down, you will be able to see a lighted opening on your right. It is one of the two openings the crocodiles were coming out from before. Stay close to the opening, so that you can see where Lara is aiming, so as to avoid shooting in the air. Once you kill them, search for an opening in the floor in the northeast corner. Drop through it to reach the entrance of the pool with the bridges. Make your way back to the top of the bridges and climb on the rocks. Then jump to the opening on the right. A crocodile will attack as you proceed inside. Quickly jump back to the rocky ledge you came from and kill it from there. When it is dead, jump into the opening again and hang from the ledge on the right. Shimmy to the right until you can pull up. Pick up the Shotgun Shells and jump to the ledge with the cat statue. Enter the room behind and use the Gold Key to open the door. Room with three parallel ramps - Enter the room and side-step to the either left or right in order to avoid the three boulders that roll from the ramps beyond. There are two panthers behind the fence on the right that you can shoot through the fence. If they go away, you will have more chances later. Approach the base of the ramps and drop to the block on the right (as you face them). Drop to the ledge, which is surrounded by the fence, and pick up the Shotgun Shells. Shoot the panthers if they approach and climb back to the ramps. Now drop to the block on the left (as you face the ramps), then to the one below. From here you can hang and alert the panthers, climb back up and finish them off. Area beneath the ramps - Drop to the ground and approach the room in the far left corner (if the entrance is to your back). A panther will attack as you enter, so jump on one of the nearby blocks and kill it. Then enter the small room and pick up the two Small Medi Packs from the low ledges. Exit and follow the passage in the southeast corner. If you climb on the ledge with the cat statue (with your weapons holstered), you will get a glimpse of an outside area. Continue to the next room. Pick up the Small Medi Pack and throw the switch to open the doors at the top of the ramp. Return to the area beneath the ramps and follow the passage in the southwest corner. As you turn around the corner, the cat statue will transform into a panther. Back up and jump on the nearby block from where you can safely kill it. The passage leads to T-junction. The right hand way gets you to a Small Medi Pack and the left (dark) one to some Shotgun and Magnum Clips, which are next to the area beneath the ramps. Once you get everything, climb back up to the base of the ramps. Four boulders will roll from the top of the three ramps as you go up them. Start with the middle ramp and when you see the boulder rolling, side-jump to the right ramp. The boulder here will start rolling, so side-jump back to the middle ramp. Start going up the middle ramp (slowly) and the boulder from the left will roll. When it does so, jump to the left ramp and go up it. The last boulder will roll from the top of the middle ramp. Kill the panther that lurks below and drop down. Enter the next room. Spiked pit with two wooden bridges - Take a standing jump to the first bridge and a running jump to the second. If you climb on the ledge with the statue, you will get a glimpse of the outside area. Take a running jump to the opposite ledge and pick up the Shotgun Shells. Then jump to the alcove on the right (if the bridges are to your back) to get some more Shotgun Shells. Turn around and take a running jump to the opening. Take another running jump to the alcove with the Small Medi Pack. For the second Medi Pack, you will have to reach the second wooden bridge and take a running jump to the alcove. Drop into the pool below and quickly swim through the opening to avoid the two crocodiles. The tunnel will get you to a room with a lever at the far left. Pull it to open the nearby door. Swim through it to reach a pool outside. Climb out of the water, using the left hand ledge. A panther is lurking here, so climb on the block ahead and kill it from safety. Then kill the crocodiles and jump into the pool you came from. Return to the lever and get the Shotgun Shells. Then exit to the sandy area. Sandy area - There are two sets of Shotgun Shells and a Small Medi Pack in the southwest corner of the area, but do not be in a hurry, because two boulders will roll from the ramps. Proceed a bit and when you see the boulders rolling, back-flip and side-jump into the pool. Then climb out of the water and get the pick-ups. Enter the area close to the spikes (be careful of the nearby spiked pit!). Kill the panther and pick up the two sets of Shotgun Shells. When you do that, another panther attacks, so kill it. Return to the pool and climb on the block. Drop to the passage behind it and proceed to the back-side of the area. The two cat statues will transform into mummies, so roll and run to climb on the block. If you think you are not fast enough for this, run and jump between the block and the sandy hill. Kill the mummies from the block and approach the bridge. The mummy at the end will not awaken, so move freely. Go to the right side of the bridge and drop onto the block below. Kill the crocodile and jump into the pool. Get the Small Medi Pack and climb back out. If you want to finish the level, cross the bridge to the end. The mummy will awaken, but it will fall down. Step between the two cat statues to end the level. Rest of the desert - If you want all the kills and pick-ups, you need to go behind the mummy. To do that, stop when you see the mumy falling down. You can jump to the either left or right of the cat statues, and here is one way: position Lara on the third plank of the last part of the wooden bridge and side-step to the right to reach the edge. Turn right 45 degrees and aim the area beyond the corner of the ledge with the cat statue (as shown in this screenshot). Tap back once and take a running jump. Once you reach the corner of the ledge, press the left direction key to pivot Lara. When you land, a panther will attack. If you need a safe ledge, climb on the one with the cat statues, but make sure you climb on the back ledges and not on the middle or front ones, or you will end the level. The sand beyond the ledge is very hot and Lara dies when you step on it. The same goes for the area on the left (if the statues are to your back). Go towards the two palm trees and continue straight ahead. Do not proceed a lot. Turn right when you see the low ledge and climb on the sandy ledge close to the pillar. Jump into the pool and get a pair of Uzis and two sets of Clips for it. Climb out of the water using the left hand ledge and kill the mummy. A second mummy is waiting in the fenced area you were before. You can shoot it through the fence and kill it. Then climb on the hill close to the pool and take a running jump over the fence (as shown in this screenshot). You need to return to the wooden bridge and you know the way. Once you reach it, cross it to the end to end the level.
|
||
| Index | Level 2: Temple of the Cat » | |
| We would like to thank Nicky for her help. Many parts of this walkthrough would not have been written without her participation. Last update: 07 Jan. 2007 |
||
Tomb Raider Gold: Shadow of the Cat & Unfinished Business Walkthrough & Game Guide © 2000-2007 www.tombraiderhub.com |
||