Tomb Raider 3: Adventures of Lara Croft Walkthrough & Game Guide
NEVADA: High Security Compound
*(We do not count the prisoners.)
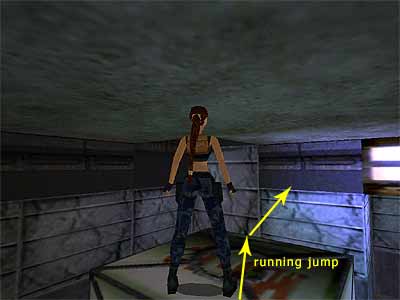
You begin this level weaponless, as the guards took all of your weapons (and ammos). You have just one Small Medi Pack (or the Save Crystals if you are playing the PS version) and the Infada Stone in your inventory. You are going to meet many prisoners that are friendly and will help you, so there is no reason to hurt them when you get your Pistols back. Do not even think to perform the cheats for the unlimited ammo, because you will explode poor Lara. Bay C - Turn around and climb on the windowsill to cross the green laser beams that alert one guard. When he enters the cell, run past him and exit. Turn left and push the button to open the next cell and release one prisoner. Let the prisoner kill the guard and if you want, press the other button to open the next two cells and free a second prisoner. Cross the catwalk to reach the opposite side. Push the right hand button to open the two cells and release two more prisoners (you can push the left button, but there is no prisoner inside). Enter the far left cell and jump over the sink on the left hand side to land into the opening. Push the movable crate once and crawl through the opening on the left. Crawl through the next opening and push the second movable crate once. Turn right to face the first crate (you are on the other side) and push it twice beyond the crawlspace. 1st Secret - Before climbing out, go to the second movable crate and pull it twice. Crawl through the two openings and pick up the Small Medi Pack where the second crate was. Outside - Climb through the opening to reach the walkway above. Head forwards until you reach a pit with barbwires at the bottom. Take a running jump to grab the opposite side and pull up. Continue ahead and walk through the barbwires (notice the ladder on the left) to reach the switch at the end. Use it to open the trapdoors behind and climb onto the ledge to the left. Stand above the ladder and drop backwards to grab the edge. Start climbing down and halfway drop into the hallway on the left hand side. Inside again - Follow the hallway and notice the floor. The dark part is a trapdoor, so jump over it and it will open as Lara clears it. Do not worry if you accidentally fall through this trapdoor. You can still continue, only have in mind that you may attract a guard's attention that is lurking below sooner. Go to the end of the small room and head to the far left corner where a second trapdoor is. Step on it and allow Lara to fall through. A guard is patrolling around, so turn around and enter the control room. Throw the switch to open the gate that leads back to the jail area and let the prisoners enter this area. Roll and run to the left corner of the glassed wall to be safe from the guard. The prisoners will eventually kill him, so exit and pick up the Shotgun Shells, the Small Medi Pack and the Keycard Type A the guard dropped. Crossed hallways\ Lavatory (Bay D) - The closed gates opposite the jail area open with the Card you just got. Use it to the electronic lock on the right hand side of the closed gates and enter the hallway. Pass the first vertical hallway on the right and on the T-junction go to the left. Push the button at the end to open the door and enter the lavatory. Push the second button at the end to open the next door. Enter the room with the three crates and locate the movable crate at the far right. You need to move it beneath the opening on the left, in order to climb through it. (Check the Note about the movable crate below if you want to avoid pushing\ pulling it.) The procedure is obvious: you need to push\ pull the crate around the column. Stand in front of the crate having the opening and the doorway you came from to the back of you and pull it once. Vault onto the small ledge on the right and go behind the crate. Push it once. Go to the right around the column and pull the crate once. Go to the left around the column, vault onto the small ledge and drop down at the other side to stand in front of the crate, having the opening and the doorway you came from to the back of you. Pull the crate once, climb onto it and drop down at the other side. Now push it beneath the opening. Climb on the crate, then onto the upper ledge. (Note about the movable crate - If you want to avoid pushing\ pulling the crate, you can directly jump and grab the upper ledge. There are two more crates in this room. Ignore the first one next to the doorway and climb on the second crate. Lara's head brushes the ceiling, but this cannot prevent you from performing the next jump. Walk to the edge having the doorway to your back and stand in the front left corner of the crate. Turn left to face the opening, tap back once and take a running jump, pressing Action to grab the upper ledge. This screenshot may help you.) Jump over the duct on the left hand side and throw the switch into the alcove. This closes the lavatory's door and floods the lavatory and the room below. Jump back over the duct and drop into the water. Swim to the other side of the room and through the opening. Surface and climb out of the water. Cross the duct being careful of the hole beyond. The stoves are lit and if you fall down, you will get burned. Take a diagonal standing jump to the right and over the hole and follow the hallway to the end to exit again. [Note - It IS possible to jump down to the kitchen whilst the stoves are still lit, and not take any damage at all. You may want to save your game first though, just in case. Jump over the hole above the stoves to the passage on the right and hop back to grab the edge of the opening. Shimmy all the way to the left. Stay a little in this position, watching the sequence of the flames below. You will notice that they go on and off on various spots on the stoves. Right below where you are hanging from, they stay off for slightly longer. Watch the sequence a bit, and when you think you are ready, drop down when they are off and immediately side-flip to the left. If you want to try this method and it turns out to be successful, skip the next paragraph.] Drop down and head forwards through the walkway. Take a running jump to clear the two pits with the barbwires at the bottom and drop down at the end. Push the button to open the nearby door and go down the ramp opposite the door. Use the switch to shut off the stoves. Do not go through the door you just opened, because there is no reason. This door only gives you a direct access to the previous area. Climb back up to the walkway and again take a running jump over the two pits. Return to the hole that leads to the stoves through the hallway. Kitchen\ Mess Hall\ Crossed hallways again - Drop through the hole and onto the stoves. Drop to the ground and get the Small Medi Pack from the green counter on the right hand side. Push the button on the other side of the Kitchen to open the exit door. There are two buttons in the next small L shaped hallway. Push the right hand one first that gives you an access to the Mess Hall and then the one on the left to open the door for the Control Room. A guard exits from there, so roll and enter the Mess Hall. Head to the far left corner to reach the crossed hallways and turn right, then left to lead the guard to the jail area. Let the prisoners take care of the guard and pick up the Small Medi Pack he drops. (Note - Make sure that you lure the guard in the jail, so that the prisoners take care of him, because if he catches up with you and there are no prisoners around, he will follow you up to the exhaust fans that follow, making it quite a hard task passing between the fans and proceeding.) Back to the Control Room\ Kitchen - Make your way back to the small L shaped hallway through the Mess Hall. Enter the Control Room where the guard exited from and push the button inside to raise the two grates in front of the exhaust fans back in the Kitchen. Return to the Kitchen, climb onto the stove, then onto the ledge in front of the fans. Carefully pass through the fans and get the Crystal. Slide down backwards pressing Action to grab the edge, shimmy to the left and drop onto the block below. Or, slide down forwards and jump halfway to grab the crevice in the opposite wall, shimmy to the left, release to drop onto the angled ledge and jump to the opposite flat block. Climb into the crawlspace and follow it around to the left. Climb up the ladder and dismount on the left. Walk along the small passage to open the trapdoor above, turn around and take a standing jump to grab the edge of the above hallway. Pull up. Bay E - There is another prisoner up there. Ignore him and go up the hallway that turns right at the end. Climb up the grate and pick up the Small Medi Pack on the left. There is a guard at the top of the ramp and since he cannot follow you down the ladder where the prisoner is, you need to find another way. Sprint up the ramp and turn right to exit. Pass between the wall and the crate on the other side and turn left (do not go to the right because the green beams will activate a gun turret). At the end, drop down all the ledges and push the button in the hallway to release a prisoner. Let him take care of the guard and get the Keycard Type B he drops. Climb up the ledges to return back up. Go between the wall and the crate, turn left and use the Card you just got to open the door of the control room. Go up the steps and pick up the Large Medi Pack and the Uzi Clips. Push the button to deactivate the green laser beams outside and exit. Cross the hallway where the laser beams were and turn left around the corner. Be careful of the opening in the floor at the end!!! Drop backwards to hang from the edge and climb down the ladder. Outdoor area/ yard - There is guard patrolling around the yard. So, as soon as you exit, turn left and drop into the hallway. Go to the end and push the first button on the left to release two prisoners. The second button on the right hand side opens a door that gets you back to the hallway where the previous guard was killed. From the current guard, pick up the Yellow Security Pass and Flares. Return back to the yard and head to other far side. On the right hand side of the machine gun, use the Pass to open the door and enter. Follow the hallway to the end and go through the opening on the left. Step on the ledge and proceed until the crawlspace. The camera switches and shows you a guard in the room at the bottom of the ramp. You do not want him to notice you, so crawl through the opening and follow it to the end. When you are able to stand, you can see the guard on the left hand side, behind the window. Quietly drop down (hang from the edge and release) and crawl to reach the switch on the other side that opens the nearby door and activates a laser beam in front of it. The camera helps you to watch the guard. When he is ready to reach the side where the door is, flip the switch to activate the laser beam and fry him (alternatively, use the switch and quickly jump over the laser beam and go through the door). Follow the long hallway to the end. (Note - At this point, you can decide if you want to take a shortcut. The normal gameplay requires you to pass through a pool beneath the Satellite Dish Tower, but many people have encountered a problem here, as it is difficult to maneuver Lara in the pool with the propeller and four outlets. The shortcut skips this part, but in order to succeed you need to have at least 100% of health. Note, however, that you will pass through this pool later, but at least it will not be so difficult, as you will have slowed down the current. Make your choice and follow the part of the walkthrough At the bottom of the Satellite Dish Tower below.) First Way\ Satellite Dish Tower area (normal gameplay) - Drop to the ledge below the Satellite terrace and go up the steps on the left hand side, moving around the central structure. When you reach the end, turn left and locate a small ledge below. Drop to that ledge and take a diagonal standing jump to grab the edge of the hallway above. Pull up and follow the hallway as it turns right. At the end, drop into the Control Room. Push the button next to the window to move the Satellite Dish, revealing an opening. Head to the other side of the room and push the button to open the exit door. Exit and go to the right. You crossed this hallway before, so once again, drop to the ledge below. Go to the left and head up the steps again. When you reach the end, turn right and climb onto the roof with the Satellite Dish. Pool with propeller and four outlets - Hang from the opening and drop into the pool below. There is a tunnel with a propeller at the bottom of the pool, so avoid it or you will get sucked. The four outlets around the room makes it more difficult to swim and surface. Swim upwards against the current and when you surface, climb onto the small ledge. (There is a tunnel in the water, but do not go there yet.) You can see a window above the ledge. Stand having this window on your left and jump to the platform below the barred window. Head to the right and take a running jump to the block in the middle of the slope. From here jump to the small triangular ledge below and take a standing jump to the alcove. Crawl through the opening and stand at the end. Follow the tunnel to the end and throw the switch to open a door beyond the grate. Make your way back to the pool. Having the crawlspace to the back of you, slide into the pool and swim towards the right hand corner, where there is an underwater tunnel (you can jump at the end of the slope turning right in midair to reach the tunnel in safety). Follow it as it turns left and get a Small Medi Pack just before you surface. Vault onto the ledge to the left and crawl through the opening. There is a guard patrolling in the room at the end of the crawlspace. Wait for him to move to the left, crawl outside and stand up. Run to the right and go through the door you opened by using the last switch. As soon as you exit, climb up the ladder on the left and follow the hallway to reach the bottom part of the Tower - skip the next paragraph. (You can push the button in the alcove just before the ladder in order to close the door and lock the guard inside, but it is not necessary if you are quick. The most important thing is that you will avoid back tracking later for the next Secret). Second way\ shortcut - Instead of going up the stairs on the left to the roof with the Satellite Dish, turn to step on the extending ledge on the right. Turn so that you have the opening from where you dropped to your back and to the left (as shown in this screenshot). Warning: Your health must be 100% for the next task to be accomplished. If you were careful during your encounters with the guards up to now, this will not be a problem. Hang from the edge and drop down, losing some health. Perform a roll before landing, so that Lara loses less health. In that case, it is not necessary to have 100% health, but make sure you have enough to begin with. If you jump from another side of the ledge, Lara most likely will not survive the drop. At the bottom of the Satellite Dish Tower - Go around the Tower to reach the exact opposite side. Climb up the ladder and follow the hallway to the end. Take a look on the left of the T-junction. A guard is standing with his back to you, so carefully go to the right and climb through the crawlspace to get the Yellow Security Pass. Crawl back out and carefully make your way back to the hallway. Climb down the ladder to reach the bottom part of the Tower and head back to the other side. Enter the hallway, climb down the ladder and go to the right. (If you followed the normal gameplay and have already passed through the pool with the propeller once, the door on the left should be open. If you took the shortcut, this door is closed. Push the nearby button to open it, so that you will not have to back track later for a Secret). Ignore the ladder and use the Pass to the panel next to the window. This closes a door in front of the propeller in the hole at the bottom of the pool and slows down the current. Your next task is to go to that pool again and depending on if you took the shortcut or not, do either: 1. If you followed the normal gameplay, you do need to pass through the room with the guard. Back track a bit and climb up the ladder you ignored before. Go to the left and walk to the edge of the wide opening. You should recognize this area. Turn around and drop backwards to grab the edge. Drop onto the ledge below and step off into the water. Swim down and into the hole, picking up the Crystal. 2. If you took the shortcut, you can follow the above, but you will miss a Small Medi Pack. If you want it, back track to the ladder you climbed down before (when you came from the bottom of the Satellite Dish Area) and if you have not done so, push the button on the right hand side to open the door. Follow the passage ahead of the door and crawl through the green opening (there is no guard for you here). Jump in the flooded tunnel and get the Medi Pack on your way. Swim to the room with the pool and try to surface for air because you have a long underwater route ahead of you. To manage this, stick to the right hand wall whilst in the tunnel, but as soon as you exit in the pool, swim diagonally towards the center of the pool and upwards. It should be easy this way. Otherwise, the current will drag you at the sides, making it rather tough to surface. Swim through the tunnel, getting the Crystal on your way. If you cannot manage escaping from the outlets no matter what, get the Medi Pack and back-track in order to follow the first way. Note, however, that this time you will have to avoid the guard. Underwater tunnel - Follow the tunnel to the end, getting some Flares on your way and pull the underwater lever to open the door. Keep swimming, get the Small Medi Pack and be careful when you are ready to surface in the next room, because there are yellow horizontal beams above the water. Climb on the ledge and take a standing jump to the opposite side, jumping from the middle of the ledge to avoid hitting on the beams. Drop into the water and follow the tunnel. Climb out on the left and crawl into the next room where the prisoner is. Climb onto the crate on the left hand side, then onto the next one. Drop down on the other side (notice the now harmless gun turret on the ceiling) and push the button to open the door. Go through it and pick up the Large Medi Pack, the Pistols, the Desert Eagle Gun and two sets of Clips for it (at last!!). Return back, but watch out the green laser beams in front of the door. If you pass through them, you will activate the gun turret above. Stick to the right hand wall, climb onto the crates and drop down at the other side. 2nd Secret - Now that you have got some weapons, let's back-track and get a Secret. You need to reach the hallway where you saw the guard with his back to you. So, crawl through the opening you came from and drop into the water. Swim through the tunnel and climb out on the other side. Carefully drop into the pool below (the yellow laser beams are still active) and swim through the underwater tunnel. Return to the pool with the four outlets (surface here if you need some air) and once again swim through the tunnel in the corner. Surface at the end and step onto the ledge on the left. Crawl through the opening, stand at the end and kill the guard you ran away before. Go to the right and through the door and climb up the ladder past the alcove. (Note - If the door is closed, return to the pool with the four outlets and surface at the top. Climb onto the small ledge and jump around the ledges. Crawl through the opening and use the switch at the end of the hallway.) Once again, exit to the bottom of the Satellite Dish Tower and go around it to the exact other side. Climb up the ladder and head up the ramp. Kill the guard on the left of the hallway and pick up the Grenades and the Keycard Type B (#2) he drops. Use the Card in the lock at the end of the hallway to open the door. Go through it and pick up the loaded Grenade Launcher (four more Grenades or two pairs of them). Make your way back to the room where you climbed the crates in order to get the weapons the same way you came (via the bottom of the Satellite Dish Tower, the hole in the pool with the four outlets and the pool with the yellow laser beams). Back in the room with the crates - Go up the ramp on the right hand side and draw your weapons before going around the corner. The action is about to begin (it was time!!). Kill the guard at the bottom of the next ramp and the three MP's at the top. One more MP appears from the left outside. Take care of him and turn around to kill the German shepherd that is coming from behind. One of the MPs dropped a Blue Security Pass and Grenades. Pick up the items and go outside. Turn left and enter the small dark room where the MP's came from (the German shepherd may attack here instead of along with the guards, so stay sharp). Pick up the Large Medi Pack, return outside and re-enter the hall. Climb up the ladder at the top of the ramp, turn around and follow the hallway. Use the Pass you just got to open the nearby door. A guard rushes out, so take care of him. You will find two buttons in the small control room. The one next to the door activates the conveyor belt that sends a crate at the bottom in the room below and the second one opens the double gate outside letting in an MP and his dog. (Do not bother with this button if you are not interested in all kills. The double gate closes behind them.) Climb down the ladder and go down the ramp. If you release the threats, kill them now. Climb on the crate you moved, then up the ladder. Turn right and jump up to grab the bars above. Monkey swing to the other side and drop onto the ledge. Pick up the Small Medi Pack, grab the bars above again and traverse to the left past the swinging hook. Drop down and climb onto the upper ledge. Kill the guard and pick up his Yellow Security Pass (#3). Warning: Be careful where you kill the guard. He may drop dead just where the beams are and you will not be able to get the Pass, because Lara dies on the spot!!! Carefully jump over the green laser beam and get the Crystal on the other side. Make you way to the ground and use the Pass you just got to open the double gate at the bottom of the short ramp. Loading Dock (Bay X) - Follow the hallway to exit. Kill the MP that is hiding behind the low block on the left and enter the loading dock. Kill another MP from the left and head to the far right corner to locate a movable crate. Pull it once and go to the back side. Enter the alcove and pick up the Uzi Clips and the Grenades. Climb onto the stacked crates on the other side and drop into the hole to get two sets of Desert Eagle Clips and a Small Medi Pack. Climb out and get on the truck to end the level. The cut scene shows Lara hiding behind a crate because she heard some noise from outside. Two men close the doors of the truck and one of them starts the engine. Lara finds a soda and drinks it being ready to enter Area 51.
|
||
| « Nevada Desert | Index | Area 51 » |
| We would like to thank Nicky for her help. Many parts of this walkthrough would not have been written without her participation. | ||
Tomb Raider 3: Adventures of Lara Croft Walkthrough & Game Guide © 2000-2007 www.tombraiderhub.com |
||