Tomb Raider 3: Adventures of Lara Croft Walkthrough & Game Guide
SOUTH PACIFIC: Crash Site
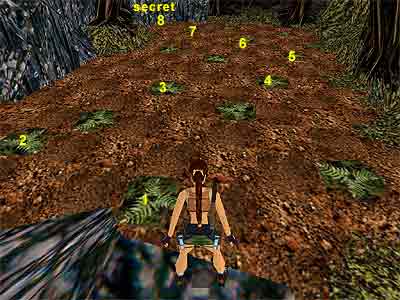
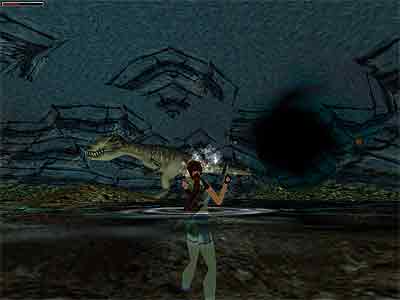
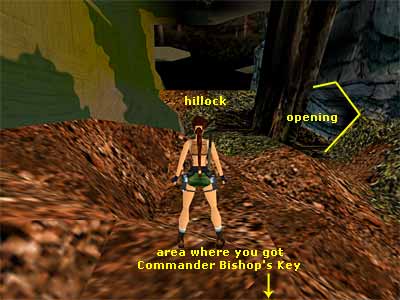
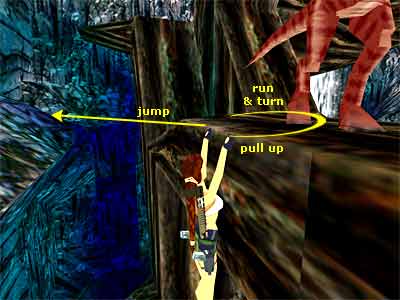
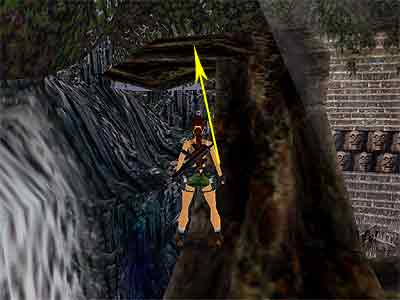
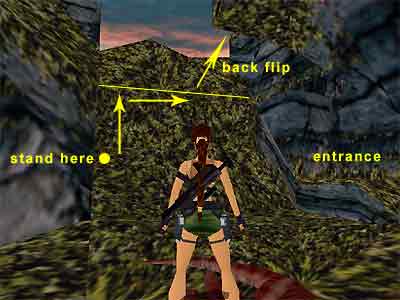
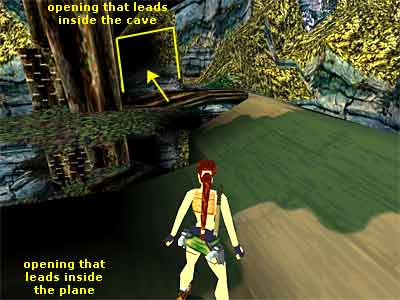
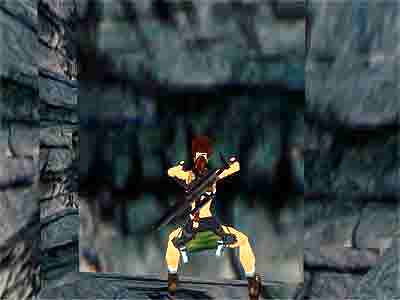
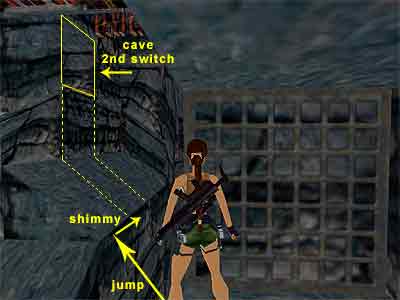
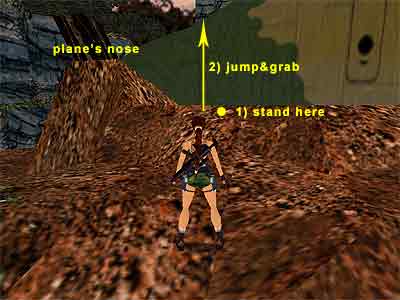
(Note about the soldiers - The soldiers in this level are friendly. If you do not harm them, they will not bother with you. In fact, they can help you deal with the raptors. Note though that the soldiers carry many items and only if they are dead you can pick them up. The statistics above show the maximum amount of kills, assuming you have killed all the soldiers without allowing the raptors to do the hard job for you.) When you begin the level, you have the Swamp Map in your inventory, the one that the soldier gave you in the cut scene at the end of the previous level. Exit the tree house and safely drop to the ground. If you do not want to lose health, take a running jump towards the alcove opposite the tree house pressing Action. Lara's head will bump onto the leaves above, but she will drop to the slide below. Go towards the swamp. (Note - If you attempt to go back to the Village of the previous level, an earthquake will prevent you from doing so. If you want to try, make sure you save your game first because the falling rocks may kill Lara. If you sprint though, you will see that the passage leads to a dead end.) Examine the Swamp Map to see which of the plant squares of the swamp are solid in order to jump onto. The red X's indicate the safe squares. So, jump from square to square to reach the opposite side. If the map does not help you, see this screenshot. 1st Secret - Just before jumping to the bank, locate the alcove in the far left corner of the swamp. Jump to the square beneath it and climb into the alcove. Pick up the two sets of MP5 Clips, drop to the square beneath the alcove and jump to the previous one. From there, take a running jump to the bank. Continue between the trees, but before sliding down, go to the left hand side of the slope. Take a diagonal running jump to the block on the left and pick up the Grenades. Drop down and continue to the bottom. A raptor emerges from the misty passage, so kill it. You can have your weapons drawn and start shooting as soon as the raptor appears. Back flipping and/ or side-jumping whilst shooting is very effective - you can even kill it with Pistols. This way it may die before it reaches you, as it is slow. Note also, that you can climb onto a block and kill the forthcoming raptors from safety. Have in mind though that if the block you choose to stand on is too low, the raptor can still step on it and attack you. Crash site area - Continue through the misty passage, pass the shallow pool and climb into the cave. Climb on the block in the right corner and jump on the next one to the left. Climb to the passage above and follow it to reach an opening. Drop down to the area with the crashed plane. A raptor emerges from behind the tree on the left hand side. Take care of it. (Note - There are several areas here that you can explore in any order you like. The goal is to find two keys, use them in the crashed plane and end the level. Note that the order we follow in the walkthrough is according to the areas' appearance without back-tracking.) Commander Bishop's Key - Go through the passage between the plane's nose and the rocks. Before reaching the other side, notice the alcove on the right hand side (or having the plane's nose to the back of you, the alcove is on the left). Drop down and climb to the next area. Pick up the MP5 Clips (or the MP5 Gun if you do not have it). Beyond you can see a soldier. Do not kill him yet. If you drop down and enter the clearing, two raptors will attack - one from the left and one from the right. You can jump on the safe ledge to the right hand side of the area and let the soldier deal with the raptors. If the soldier will not make it and the raptors kill him (or if you kill him), you can collect the MP5 Clips from his dead body. If you want the soldier to kill the raptors, you need to attract the attention of one of them, because he cannot kill them both at the same time. A good way is to trigger the raptors and immediately run and jump back onto the ledge whence you entered this area. One of the raptors will try to reach you and the soldier will have time to kill the other one. Make sure you stay close to the edge or the raptor will not realize your appearance and will run towards the soldier. Or you can try this: jump down to the clearing to attract the raptors. Immediately jump back up and drop down to the passage from where you entered. From there, you can hear the soldier shooting the raptors. When the shooting stops - and the soldier is most probably dead - climb back up. The soldier died but also killed one of the raptors. Stay on the ledge and shoot the remaining one. It will try to hide behind the trees, but if you side-step left and right, Lara will manage to aim and shoot it. Once the area is clear, climb on the ledge to the right hand side of the area. Turn around and take a running jump to grab the branch and pull up. Pick up the Large Medi Pack. 2nd Secret - Walk to the edge of the branch and take a standing\ running jump to the next branch with the Flares. Jump from the left hand side of the branch without pressing Action or Lara will not make it. Get the Flares and safely drop onto the ground. Approach the slope. If you are low in health, you can enter the alcove on the left of the slope and go down the steps. In front of the closed gate, you can find a Small Medi Pack along with some Flares. Slide down to enter the cavern. Four compsognathus are running towards the dead raptor and eat it. Kill them because if you approach them they will start biting you. There is a closed gate on the left with some Flares in front of it. Exactly opposite the slope is a block with a Small Medi Pack. Get it and run towards the pool. There is another closed gate at the far left. Pick up the Flares in front of it, return to the pool and go to the other side of the cavern. When you reach the land, notice another Small Medi Pack on the block to the right. Run to the top of the mound. Inside the nest you can see the dead body of Commander Bishop. Turn to face the pool and pick up the Commander Bishop's Key next to the dead body. When you do that, mama T-Rex appears and the gate on the other side of the cavern (close to the dead raptor and the slope) opens. To kill the T-Rex, drop into the pool and position Lara so as the water is at her waist (as shown in this screenshot). That way the T-Rex cannot reach you. You can also avoid the T-Rex and complete the next part quickly. Just make sure you stay away from it because you lose health even if its tail touches you. However, killing the T-Rex makes you have a clear area and complete the next part at your ease. Alternative method - As soon as you collect the Key, immediately jump out of the mound and dash to the newly opened gate. The T-Rex will follow you, but it will not be able to reach you in there. Shoot it from this safe spot until it is dead. You may need to pop out a few times to lure it near you, because it may turn its back to you and go away, but when you see it approaching you again, immediately run back to your hiding place and shoot it. From these two safe spots (the middle of the pool or the gate) you can kill the T-Rex with your Pistols, but be prepared that the process will take some time. Jump out of the nest and use the left shallow part of the pool to reach the other side of the cavern, close where the dead raptor and the slope are. Go through the gate you opened by collecting the Key and use the switch to open the gate beyond the pool. Exit and run towards the pool. The gate is at the far left. If you have not killed the T-Rex, make sure you use the left shallow part of the pool. Enter the alcove and use the switch to open the second gate back where you used the first switch. This gate gets you back to the upper clearing. (The two lit torches high on the walls of the cave will help you locate where exactly the two gates are.) Another raptor appears back there and if the soldier is not dead, he will deal with the raptor. Otherwise, it will use the new opened gate and attack. In that case, you can get waist-level in the pool and kill it from safety with your Pistols. Make your way back to the first switch and go up the steps picking up some Flares and a Small Medi Pack on your way. Once inside the passage with the pick-ups, the T-Rex cannot reach you (assuming you have not killed it). Make your way back above the slope, run past the clearing and return to the crash site the same way you came. Back to crash site - Go through the passage having the plane on your left. Just before the hillock, notice the dark opening on the right hand side, behind the tree (as shown here). Drop down and pick up the MP5 Clips. Continue to the end of the hallway and the gate will open as you approach. As you enter the area with the dead raptor and the soldier, the gate closes behind you. If you approach the goodies, five compsognathus will emerge from the alcoves around. Kill them and pick up the Large Medi Pack and the MP5 Clips (or the MP5 Gun if you do not have it). Use the two switches in the alcoves to open the gate. Return back the same way you came. Lt. Tuckerman's Key - As you return back to the crash site, turn right and run up the hillock. You can see two soldiers trying to kill a raptor. Let the soldiers do the hard job for you and if you want, kill them both and pick up their two sets of MP5 Clips (kill them with the MP5 Gun. You will lose about 20 clips but you will get 120). Go towards the stream (do not fall in there) and enter the tunnel near the waterfalls on the right hand side. Go through the passage on the right of the tunnel to reach an area with a pool. Area with pool and trees - Here you can find a soldier on the right and a raptor that attacks from the left. You can jump on the block to the right of the entrance and let the soldier do the hard job for you. If the raptor kills the soldier, take care of it and collect the MP5 Clips from the soldier's dead body. (Note - In some versions of the game, there is only one soldier and no raptor in the area behind the hillock and two soldiers and a raptor in the area with the pool. In that case and if you did not kill the lone soldier, he will dash in the area with the pool and assist.) Do not try to cross the bridge. It will collapse and drop you into the pool with the piranhas. Climb on the low block to the left of the entrance (as you face it) and then to the upper block. There is a raptor on the branch above and you can kill it from here if you want. Climb up the vine-covered rock and press Jump to back-flip onto the slide behind. Keep pressing the Jump button to land on the branch. If you did not kill the raptor before, jump backwards as soon as you land on the branch, pressing Action to grab the edge. Shimmy a bit to the right and wait until the raptor moves away. Do not expect it to go too far away from you, but pull up when it is not standing right above you. As soon as you pull up, immediately take an open left turn and take a running jump from the branch to the flat ledge on the opposite wall (as shown in this screenshot). Turn around and kill the raptor at your ease with your Pistols. Proceed to the left of the branch (if you face the pool), towards the tree trunk. Take a diagonal running jump to the flat ledge on the left and jump on the triangular ledge in the corner. Turn right and, from the backside of the ledge, take a standing jump to the branch ahead (or jump to grab the branch and pull up). Kill the raptor that is lurking on the branches to the right and jump to the stone ledge to get the Crystal. 3rd Secret - From the ledge you got the Crystal, jump to the branch that its left part bends upwards. Go towards its bend part, turn left and take a diagonal standing jump to grab the higher part of the branch (see this screenshot). Pull up and pick up the MP5 Clips. Safely slide back down. Go to the end of the branch towards the hanging raptor carcass. Walk to the front corner and take a running jump to the greenish ledge on the left. Pick up the Small Medi Pack at the end and shoot the hanging raptor. It will fall into the pool and attract the attention of the piranhas. Now you can swim freely around the pool. So, jump into the water and use the underwater lever close to the bridge to open the gate that leads into the Temple. Swim to the other side of the pool where you can find a low ledge to climb out. A raptor emerges from inside the Temple, so take care of it. (If you are having troubles killing the raptor, you can jump back into the water. The raptor will enter the Temple and you can climb out and shoot it again. Or dash in the Temple and jump on the block near the entrance. You can kill this and all the forthcoming raptors from there. Be careful though not to stand at the very edge of the block because they may hurt you. Also if they run out of the Temple, you may need to step down on the ground to lure them back in, then jump on the block again.) When you enter the Temple, the gate closes behind you and another raptor appears. Quickly jump on the block and kill it from safety. There are three switches in the room that you need to use in order to open the trapdoor above the block. When you use the first one on the left, the gate opens and another raptor appears. Quickly jump on the block and kill it from here. The second switch does not release anything but it needs to be used in order for the trapdoor to open. The third switch releases two more raptors, so kill the from the block and climb on the ledge above. Get the Crystal and approach the dead body of Lieuten Tuckerman. Pick up the Lt. Tuckerman's Key next to his body and draw your weapons because a raptor appears from nowhere. You can either kill it or quickly drop down to avoid it. Exit the Temple and jump into the water. Climb out on the other side, using the low ledge on the right hand side and follow the passage from where you entered to return back to the crash site. When you reach the open area with the stream and the waterfall, go to the left and climb on the hillock to return back next to the plane. Now you can decide if you want two more pick-ups (a Crystal that is useful for the PS players and Uzi Clips). You need to visit a cave and follow a rather complicated route, using switches and traversing around the cave. If you want to see everything, continue with the walkthrough and enter the cave. If you are not interested at all, follow the part Getting at the top of the plane of the walkthrough below, on how you can get to the top from the ground. Dark cave (not necessary to be completed) - There are two ways to enter this cave. First way: Go towards the entrance of the crash site. There is a tree on the right hand side (as you face the entrance) from where the raptor once appeared, remember?. Behind the tree, find the block that is half-covered by the leaves. Climb on it and turn to face the plane. Take a standing jump to grab the ledge above and pull up. Turn right, walk to the edge and take a standing jump, pressing Action to grab the bars on the tree branch. Traverse to the end and drop down. Carefully walk to the left and around the branch and take a running jump to grab the handholds of the trunk; climb to the top. You can either grab the bars above, traverse to the end and drop down, or take a diagonal running jump to the greenery on the right. In both cases, the camera helps you locate the climbable rock that leads down. Grab it, climb down and shimmy to the left until you can pull up (skip the next paragraph). Second way: Go towards the opening you entered this area and notice the ledge above. Opposite the ledge you can see a slope and a second one below. There is a flat ledge on the left of the lower slope that you can stand (jump) on it. From there, jump up to grab the slope above and shimmy to the right, almost to the middle of the slope. Pull up and press Jump to back-flip onto the ledge. (You may need to press Roll and Action at the same time in order to twist in midair and grab the ledge. Also, this screenshot may help you.) Crawl through the opening and follow it around to the left. Drop down and climb on the low block next to the slide. Grab the bars above and traverse to the other side, then make a U turn to reach the doorway. Drop down. From the doorway, drop to the ledge below to enter the cave. To get the Crystal, stand beneath the doorway (Lara's back must touch the wall beneath the doorway), turn to face the block with the Crystal and take a standing jump without pressing Action or Lara will not reach it. To get back, turn to face the doorway and walk to the front left corner of the block. Take a standing jump to land directly on the ledge beneath the doorway, or press Action to grab the ledge and pull up. [Note - You now have to complete the next part that includes switches and monkey bars in order to reach the other side of the cave and finally pick up the Uzi Clips. However, you can get the Clips, skipping the painful part of the cave. To do that, exit the cave from the opening and the crawlspace you came from. You need to get on top of the plane and to do that, take a look at the part Getting at the top of the plane of the walkthrough. Once at the top, ignore for now the opening that leads inside the plane and proceed to the back side. If you take a look on the left, you will spot an opening in the wall. This would have been your exit if you had followed the procedure inside the cave. You simply need to step on the branch next to the plane and take a running jump to grab the edge of the opening (as shown in this screenshot). Pull up and drop into the cave, where you can find the Clips.Then you can take a running jump back to grab the branch and proceed inside the plane.] Whilst facing the doorway, enter the alcove on the left and throw the switch #1 to re-arrange the bars on the ceiling, above where you got the Crystal. Climb to the doorway, turn to face the cave and grab the bars above. Traverse to the other side (passing above the block you got the Crystal) until you reach the wall. Stand against the wall, release Action and press it again to grab the climbable wall below. Climb down, then to the left and then up into the alcove. Throw the switch #2 to raise another bar beyond. Turn around, walk to the edge of the alcove and take a standing jump to the block below, where you got the Crystal before. From there, jump to the ledge beneath the doorway as you did before (or grab it and pull up) and once again, use the switch #1 to re-arrange the bars above where you got the Crystal. Climb to the doorway, turn to face the cave and grab the bars above. Start traversing and this time go to the left (you cannot go forwards, as the bars are down). Continue where the bars lead you, around the cave, until you reach the end. It is a long way, so do not stop going. You can see some bars on the left and a climbable wall on the right. Stand against the wall, release Action and press it again to grab the wall. Climb to the very bottom, passing the closed gate, until Lara's feet are at the bottom part of the wall. Press Jump to back-flip into the alcove behind (this screenshot shows where Lara must hang from the wall). Throw the switch #3 to raise the bars above and open the gate you passed before. Jump to grab the wall, climb up, then to the right and then into the alcove you just opened. Unfortunately you cannot grab the bars above, so you need to take the long route again. Take a standing jump to the slide beneath the alcove where you used the second switch and press Action to grab the edge of the slide. You can also take a running jump, but be careful not to fall down whilst tapping back. Shimmy to the right if necessary to hang beneath the alcove with the second switch (see this screenshot), pull up and back-flip onto the block where you got the Crystal. Turn around and jump to the ledge beneath the doorway (or grab the ledge and pull up). Once again (ok, this is the last time!!), climb to the doorway, turn to face the cave and grab the bars above. Traverse around the cave as you did before and when you reach the end, continue to the left (since you have raised the bars) and drop down at the end. Pick up the Uzi Clips and climb on the block. Follow the passage to exit the cave. If you do not have both Keys, safely drop to the ground and go towards where you entered this area. If you have already got the two Keys, take a running jump to grab the branch ahead, pull up and proceed into the plane (skip the next paragraph). Getting at the top of the plane - If you have the two Keys and you are not interested in entering the cave, go to the front side of the plane. As you face the nose of the plane, locate the flat ledge on the right side of the plane. The half angled part of the ledge prevents you from stepping on it, but you can jump. Then you can climb on the plane (see this screenshot). Once at the top, proceed to the other side towards the opening, taking standing jumps to clear the angled parts and pressing the Look button to break the camera that shows Lara from a distance. Inside the plane - There is a raptor lurking in the plane. Hang from the edge of the trapdoor to attract it and pull up to shoot it from there. Repeat this a few times, so as to kill the raptor without health loss. Once you are done with it, drop down inside the plane. Pick up the MP5 Clips (or the MP5 Gun if you do not have it) and enter the cockpit. Use the two Keys to the locks alongside the entrance to open a door to the lower part of the plane. Go to the other side of the plane and drop through either of the holes. Take a notice of the big Rocket Launcher and go to the other side. Throw the switch to open the doors of the plane and extend the Rocket Launcher. The fun part just started. Approach the Rocket Launcher and 30 (oh my!!) raptors will start emerging from the alcoves around. There are also two soldiers outside who will try to kill some of the raptors, but unfortunately it will be difficult for them to survive. Use your new toy to explode the raptors. Press Action to grab the gun and use the direction keys to move it around. Like an ordinary weapon, press Action to fire. When all raptors are dead, use the gun to explode the far left corner of the wall. To let go of the gun, press the Roll button. Alternative method - The raptors will not follow you inside the plane. If you are having troubles maneuvering the gun, you can use even the Pistols and kill the raptors from inside the plane. You just need to step outside a few times in order to attract their attention. You can also climb on the top of the plane and kill the raptors from there. Or explode the wall, cross the bridge above the stream and kill them from there. You can also totally avoid the raptors - explode the wall, head to the far left and jump from the wing to the opposite side. Once the raptors are dead, collect the two sets of MP5 Clips from the soldiers' dead bodies. Go to the far left of the area and jump from the wing of the plane to the opposite side. From there climb on the block and jump to the platform on the right to get the Large Medi Pack and the Crystal. Take a running jump to the other opening and go down the steps to end the level. The cut scene shows Lara entering a Temple. She finds a tribesman there, who tells her that she is lucky he is fasting today, as she could have been a nice meal (LOL!!). Lara tells him that she might be hungry, famished actually. She then shows him one of the paintings on the wall and asks him why his ancestors fled from Antarctica so suddenly. He tells her that there was plenty of flesh there and their sixth leader, Mauki, was born without a face and the people were afraid and run away. He then tells her that a white man came with a magic Koma Koma stone and the people there celebrated his death day. Lara asks him where the stone is but she does not take a response by him. She decides to leave.
|
||
| « Coastal Village | Index | Madubu Gorge » |
| We would like to thank Nicky for her help. Many parts of this walkthrough would not have been written without her participation. | ||
Tomb Raider 3: Adventures of Lara Croft Walkthrough & Game Guide © 2000-2007 www.tombraiderhub.com |
||