Tomb Raider 1 Gold: Unfinished Business Walkthrough & Game Guide
Level 3: Atlantean Stronghold
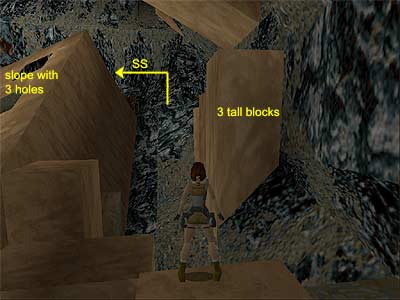
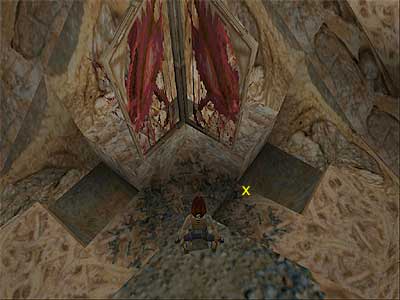
(Note - There are a couple of shortcuts you can take and end the level in less than five minutes. If you are interested, we have created a separate page here. Note though that you will miss several pick-ups and kills, and the level's second Secret.) You begin the level sliding down a ramp. Go up the next ramp, but do not fall through the opening in the floor. 1st Secret - Take a running jump above the lava pool to grab the ledge on the opposite side. Pull up and go around the tunnel to get two sets of Shotgun Shells. Jump back above the lava pool. Now carefully drop through the opening you bypassed before. Follow the passage, but wait when you reach the lava pit. Once the boulder has rolled, take a running jump over the pit. Continue to the next area with a web on the left and a large opening on the right hand side. With the way you came to your back, proceed ahead, where you will find a lava pit. Go to the left and turn right to face the alcove with the Small Medi Pack. Stand at the highest point (close to the wall) and jump with Action to land in the alcove. Get the Medi Pack and jump back above the pit. Approach the large opening and draw weapons. A mutant will attack from the left, so back up and kill it. Go around to the left, where it came from, and pick up the two sets of Shotgun Shells.(*) Now go to the right side of the central structure and drop to the ledge, which is attached to the structure. Climb in the opening on the left and draw weapons. Two flying mutants fly from below, so kill them. Then carefully drop trough the opening in the floor and onto the small ledge below. Hang from the edge and drop down, where you will find a Small Medi Pack and some Shotgun Shells (or the Shotgun if you do not have it). (* At this point, you can take the first shortcut.) At the bottom of the structure - Facing the slope with the three holes (east), jump on it to slide down and land to its base and next to a block. Climb on the block and a mutant will appear. Kill it from here and drop to the ground. If you approach the ramp between the structure and the slope with the three holes, a boulder will roll, so stay sharp in order to avoid it. Go to the corner with the tiles on the floor and pick up the Shotgun Shells. Then climb on the block with the Large Medi Pack and get it. A second mutant appears when you approach the left hand door in the northeast corner. Climb on the nearby block and kill it (the block to the left of the door, as you face it). From this block, drop onto the ledge next to the three tall blocks that are next to each other (as shown here). Walk on the ledge and the boulder will roll, but it will not hurt you. Climb on the lowest of the three tall blocks and reach the topmost with the Shotgun Shells. A flying mutant will fly from the structure, so kill it. Then drop back to the ledge below and go to the top. Drop to the passage behind the slope with the three holes and pick up the Shotgun Shells. When you reach the Shells, a third boulder rolls, but it is far away from you. Return back to the base of the slope with the three holes. Inside the slope with three holes - Locate the opening at the bottom of the slope. Hang from the edge and drop down. Being careful of the two openings in the floor, get the two Small Medi Packs. (**) Approach the hole in the northeast corner and hang from the lowest edge (as shown here). Then drop down. If you try to drop from another spot, Lara will die. (** At this point, you can take the second shortcut.) Room with pyramid and two spheres - Here you can see two familiar spheres that explode when you approach them. Do this one at a time and kill the mutants that appear from inside, being careful not to fall into the lava pits. Then pick up the three sets of Shotgun Shells and the Small Medi Pack from the blocks in the corners. On getting the Shells from the southwest corner, a mutant drops from one of the holes. Kill it from the block. Exit through the opening on the north side. A dart trap is being activated, but you do not have to pass through it. Turn right (west) and jump to the brownish ledge. Drop to the steps below and go down them. Draw weapons and kill the mutant that appears in the dark passage. Follow the passage, taking a mental note of the closed door on the left. Room with three mutants in the alcoves - The three mutants do not awaken now, unless you pick up the items behind them. Do not do this now, as you will be able to kill them from a relative safe spot in a while. Go around the steps, where the windows are. Here you will find a switch that makes a centaur appear in the next room. It will not come after you now, but you will have to deal with it at the end of the level. If you are not interested in all kills, do not bother with this switch. Now pick up the Shotgun Shells from the bottom of the steps and go up them. The switch on the column awakens the right hand mutant. Flip it and kill the threat as it comes up the steps. There are four more switches. From the outer ones, the right switch (as you face them) awakens the middle mutant and the left one in front of the Small Medi Pack awakens the left mutant. From the inner switches, the right one opens a door in the room with the pyramid where the two spheres exploded and the left switch opens the door in the dark passage you passed through before. Go down the steps and pick up the two sets of Shotgun Shells and Magnum Clips from the alcoves. Exit to the dark passage and go through the door on the right hand side. There are two spheres in this area that have probably been exploded and released two mutants. Otherwise, they will explode as you approach them. As you enter, you can climb on the ledge on the right and kill the mutants from there. On this ledge, you will find a Small Medi Pack. Jump to the opposite ledge to find some Shotgun Shells. Close to the spheres you will find more Shotgun Shells and some Uzi and Magnum Clips. Exit this area through the door you came from. Turn right and go up the steps to return to the room with the dart trap, which should be inactive if you saved and loaded. It will activate again as you pass through the entrance, but you are not coming back. When you return to the room with the pyramid in the middle, go through the opening on the right (east). Draw weapons and kill the mutant half way through the ramp. When you reach the top, vault onto the ledge and turn around. Jump up to grab the ledge and pull up. The lava that flows from ahead may reach you, so turn around and jump to the next ledge. Jump once more to the ledge ahead. Turn left and go up the ramp. Kill the mutant at the top and slide down. Pick up the Shotgun Shells and jump to the opposite side to get the Small Medi Pack. Climb up the blocks to return back to the ramps, jump to the one on the left, but this time do not slide down. Instead, jump to the opening on the right. Area with dart traps and pool - Go to the left and up the steps. Carefully pass through the dart traps to reach a room with a pool. Two mutants will attack as you move around the pool, so kill them both. Then jump into the pool and get the Shotgun Shells from the northwest corner and the Small Medi Pack at the bottom of the slope. 2nd Secret - Swim to the east side and pull the two underwater levers to open two doors (one behind the other) on the left side of the levers. Swim through the doors and get the two sets of Shotgun Shells, Magnum Clips and Large Medi Pack. Then surface and climb out of the water. Enter the next room. Here you will find one switch and two doors behind it. Use the switch to open the doors, hop back and jump on the block. Two mutants will come out, so kill them from here. When they are dead, enter the two small rooms and pick up the four sets of Shotgun Shells. With the entrance to your back, go through the passage on the left. Here you will see one switch and four mutants locked in a room. Use the switch to open a door behind the mutants. Return back to the previous room and go through the other opening, which leads to a room with a pool, two switches and some steps. Facing the pool, flip the left switch. This will release the four mutants, so quickly jump to the bottom of the steps, where the mutants cannot reach you. Kill them from here. When they are dead, use the other switch to open one of the gold doors in the area with the structure and slope with three holes. Jump into the pool and get the two sets of Shotgun Shells. Swim more down and pull the lever to open a door at the top of the steps. Surface and climb out of the water. Go where the four mutants came from and enter the room behind to get the two Small Medi Packs. Then go up the steps in the room with the pool and exit through the door. (Note - It is obvious that if you do not wish to deal with the mutants, you can totally avoid them, but you will miss a few pick-ups. Do not flip the switch on the block in the first room. Instead, enter the room with the pool, use the switch on the right, jump into the pool and pull the lever. Then go up the steps to exit.) Go through the door on the left with your guns drawn. A mutant throws fireballs from the left, so back up a bit and kill it. Take a diagonal running jump to the left to land on the ledge behind the slope. Climb on the right hand ledge, where the mutant was, and pick up the Large Medi Pack. Drop back down and jump to the alcove with the Shotgun Shells. Make sure you press Action whilst jumping in order to lower Lara's arc and avoid hitting on the wall. Alternatively, you can just run off the ledge. If you accidentaly fall into the water, you can use the various ledges to return back up. Jump into the water and get the two sets of Magnum Clips. Now you have to decide if you want to take the long or short route. By taking the short route, you will miss some pick-ups. Make your choice and follow the Common Route below. Short route - Climb on the ledge on the west side and use the switch to open a gold door at the top of the room. Turn left and jump to grab the ledge. Pull up and climb on the ledge above. Turn right and take a running jump to the door you just opened. Then take a diagonal running jump to the flat ledge on the left. Climb on the block and pick up the Small Medi Pack. Long route - The two levers open the two underwater doors that are timed. First pull the left lever to open the left door. Swim through it and get the Uzi Clips and Shotgun Shells. Return to get some air and pull the right lever. Swim through the door that opens and get the Shotgun Shells. Continue swimming through the tunnel and get the Mangum Clips. In the next room, you will find an opening, where you can surface. (Notice the door close to the opening.) Room with spikes - Climb out of the water and walk through spikes to reach the far right corner of the room. Pick up the Small Medi Pack. The switch here opens the door you saw before, but it is timed. To reach it, flip the switch, press the Look button to break the camera, roll and take a running jump over the spikes in order to land on the ledge beyond. Side-jump to the ledge on the left and side-jump again to land in the water. Swim to the left and through the door. Get the Magnum Clips (or a pair of Magnums if you do not have them) and climb out of the water. Walk through the spikes to reach the back right corner of the room. Climb on the decorated block and pick up the Magnum Clips. Climb on the block on the right and turn around. Take a standing jump to grab the ledge above the crevice and pull up. Pick up some more Magnum Clips and turn around. Take a running jump to the flat ledge ahead. Climb on the block and pick up the Small Medi Pack. Common Route - Drop back down and climb in the opening on the left. Take a diagonal standing jump to the ledge between the openings. Or walk up to the edge, step back twice and take a standing jump forwards. You will land on the slide and then on the ledge. Take a running jump to the opposite side and draw weapons. As you proceed, a mutant attacks from the left. Kill it and pick up the Shotgun Shells. When you pick up the Magnum Clips, a second mutant appears, so take care of it too. Take a running jump to the previous ledge and climb into the right hand opening. Carefully jump over the two lava ledges. At the top of the ramp you will find two sets of Shotgun Shells. Back track a bit and climb into the opening on the right (it is on the right as you come back). The opening gets you opposite the structure you saw at the beginning of the level. Jump to the platform on the right and draw weapons. Two flying mutants will soon arrive, so take them out. Then pick up the Shotgun Shells and Large Medi Pack. Take a running jump to the block on the right and pick up the Magnum Clips. Then jump back to the platform and step on the raised square. Aim for the highest opening of the slope below and take a running jump to it. Bottom of the pyramid - You land in a pool. Climb out of the water and kill the centaur (if you threw the switch in the room with the three mutants in the alcoves). Then follow the passage on the south side and use the switch to end the level.
|
||
| « Level 2: Temple of the Cat | Index | Level 4: The Hive » |
| We would like to thank Nicky for her help. Many parts of this walkthrough would not have been written without her participation. Last update: 07 Jan. 2007 |
||
Tomb Raider Gold: Shadow of the Cat & Unfinished Business Walkthrough & Game Guide © 2000-2007 www.tombraiderhub.com |
||