Tomb Raider 1 Gold: Unfinished Business Walkthrough & Game Guide
Level 4: The Hive
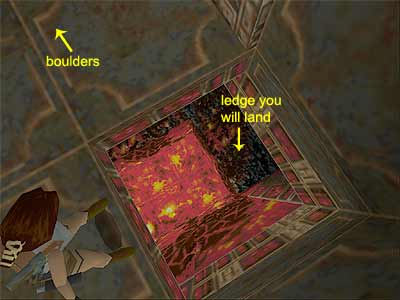
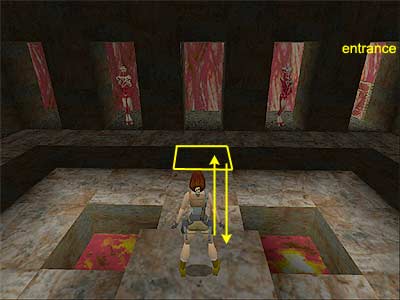
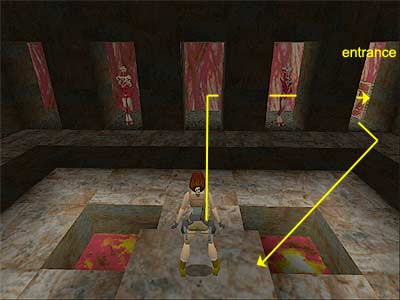
Enter the room and pick up the Small Medi Pack and Magnum Clips (notice the closed doors here). Go up the steps and pick up the two sets of Uzi Clips from the alcoves. The mutants do not awaken now, so proceed freely. Room with boulders on the ceiling - Approach the next room. There are 25 boulders (!!) on the ceiling and the first two will roll as you approach, but they will not hurt you. The deal is to reach the other side of the room and here is one way: (The following sequence is shown in this page.) Stand on the middle white square just outside the room. Step on the brown square inside the room, hop back and side-jump to either side to avoid the rolling boulder. Step on the same brown square, then onto the white ahead and finally on the next brown square. Three boulders will roll, but they will not hurt you. Now step on the white square ahead and immediately side-flip to the right to avoid the rolling boulder. Side-jump back to the white square you came from. Jump over the next brown square in order to land on the white square beyond. A boulder will roll, but it will not hurt you. The brown square ahead will make a boulder roll in your path, so do not step there. The brown squares to your left and right side will also make some boulders roll, but they will not hurt you. Use these squares to enter the alcoves and use the two switches. Every time you use a switch, a door back to the entrance opens and a mutant awakens. Kill both mutants and return back using the same squares you came from (the middle ones, following a straight path). (Note - You can take a shortcut and avoid dealing with the boulders. As soon as you enter the room, get the pick-ups and approach either opening in the floor. Take a look below in order to spot the flat ledge below, as shown in this screenshot. Walk up to the edge of the opening and tap back once. Then start running, pressing Action at the same time. This will lower Lara's arc and make her land on the ledge below. Then you have to explore the area with the lava in a different way.) Go through the right hand door (as you return back) and carefully pass through the jaw trap. Pick up the two sets of Magnum Clips and pass through the jaw trap in order to return back. Now go through the other opening and carefully pass through the two dart traps and the jaw trap beyond. Pick up the Small Medi Pack. Slopes above lava pool - You now need to take a series of jumps on some slopes above a lava pool. If you manage to face forwards it will be easier, but if you happen to slide down backwards, you can still make it. It may be end up easier sliding backwards, because you will be able to grab the slopes and take a breather. Walk up to the edge and take a standing jump forwards to land on a slide. Keep pressing Jump to jump off the slope and land on the next one. With the Jump button still compressed, Lara will jump to the next lower slope. Keep pressing Jump and you will start jumping back and forth on the two opposite slopes. Press the right direction key at the same time until Lara reaches the flat part of the slope ahead. Proceed ahead and draw weapons. A mutant will attack from the left, so kill it. Follow the path it came from and pick up the Small Medi Pack (northeast corner). As you return back, notice the opening between the rocks on the left. A flying mutant will come from there, so kill it. Then climb on the ledge on the left. Jump to the ledge at the back and head to the other side, where another mutant is lurking. Kill it and slide down to get a Small Medi Pack. Secret - Climb on the ledge above the lava pit and take a look below to spot a block. Jump on the slide, grab the edge and drop to the block. Then drop to the lower one and take a running jump to grab the block with the Large Medi Pack. Get it and take a running jump to grab the previous block. Climb on the one you came from and take another running jump to grab the block on the other side of the pit. Pull up and climb out of the pit. Go around to the left until you reach the slope above the lara river. Approach the slope on the south side and take a running jump to the opposite ledge. Go to the left until you are opposite the block with the Uzi Clips on the left. Jump to this block, get the Clips and jump to the ledge below in order to get more Uzi Clips. The two doors on the west side open when you jump on the two decorated blocks. They are timed and it does not matter which one you follow, since both lead to the same room. For the left hand door, you need to jump to the block on the east side of the lava river. The countdown does not start as long as you stay on the block. When you are ready, jump to the block where you got the first Clips, turn left and jump to the decorated block on the left. Try to land at the back side of the block, so you will have space in order to take a running jump and grab the ledge in front of the door. Then pull up and go through it. For the right hand door, jump to the block on the north side of the lava river. Again, the door remains open as long as you stay on the block. When you are ready, turn to face south and jump to the ledge where you got the second Clips. Jump to the opposite side, go to the left, turn left and take a running jump to grab the ledge in front of the door. Pull up and go through it. Room with two spheres - If you got through the left hand door, jump to the ledge on the right, which is beneath the sphere. Then jump to grab the slide in front of the right hand door and drop into the passage. If you got through the right hand door, simply turn around, slide back, grab the edge and drop down. Climb up the blocks at the end of the passage and turn around. Take a diagonal running jump to land on the ledge on the right and draw weapons. The two spheres explode and two flying mutants are released. You need to be careful here, because the mutants may push you down. As you move around the ledge, keep having the Walk button compressed in order to avoid falling down by yourself. Using a powerful weapon will definitely help your job. Turn to face south and jump to the slope on the left. Slide a bit and jump to land on the block below. (If you slide to the bottom, you can take a standing jump to the block). Climb on the ledge above, turn around and take a running jump to the ledge in front of the wide opening. The centaur at the top awakens when you reach the top of the blocks. When it does so, back up and shoot it, whilst side-jumping at the same time. When it is dead, climb to the top. Hang from the edge of the opening and drop down. Pick up the two sets of Uzi Clips (or a pair of Uzi instead of one of the Clips if you do not have them) and go through the opening. You will start sliding down and finally land in a pool. Pool with central structure - Once you land in the pool, climb on the ledge on the right hand side and kill the mutant that throws fireballs. When it is dead, climb on the ledge it was standing on and pick up the Magnum Clips. Then jump into the water and swim around to get five Small Medi Packs and some Uzi Clips. The first Medi Pack is beneath the ledge where you killed the mutant. The other two and the Clips are at the bottom of the central structure (swim through the underwater openings), the fourth Medi Pack is in the northeast corner and the fifth one in the southwest corner. Depending on where you swam in order to get the goodies, a mutant may lurk on a ledge on the north side. Swim to the west side, where you can climb out on a low platform. The three mutants beyond will awaken, so kill them from here. Jump to the ledge on the right and go around to the left to reach the steps. Drop into the pit behind and pick up the five sets of Uzi Clips. Then climb out of the pit and draw weapons. Two mutants are waiting for you here, so back up a bit and kill them. Approach the right hand side of the wide opening and jump on the block with the Magnum Clips. If you did not do it before, kill the mutant from the ledge beyond. Jump into the water and swim to the far right (northeast) corner. Here you can find a low ledge where you can climb out. Do that and turn to face the gold door. Draw weapons and start shooting the mutant, jumping up at the same time. When it is dead, jump on the block to the right and then to the doorway. Pick up the two sets of Uzi Clips from the alcoves on the left and throw the two switches to open the two gold doors (the one is behind the other). Room with pillars and switches - When you enter the next room, two centaurs attack from the back of the room. You can return to the entrance of the room and use the pillar as a back-up. When they are dead, pick up the three sets of Uzi Clips from the ledges between the switches, and the two Large Medi Packs from the far and back right corners. From the two switches that face the entrance, the left one opens the left gold door that releases a mutant and the right switch opens a door at the top of the structure in the pool outside. From the other two switches, the left one opens a second door at the top of the structure and the right switch opens the right gold door that, again, releases a mutant. It is highly possible that none of the mutants will come out or at least go down the slope. So, stay close to the gold doors and kill them. Go through either gold door. The three spheres will explode and release a centaur and two flying mutants. You can return back to the door and kill them from a relative safe spot. When they are history, jump into the water and pull the two levers to open the doors. Go through the left hand door (north side) and get four sets of Uzi Clips and a Large Medi Pack. Then swim through the other door and get three sets of Shotgun Shells, two sets of Uzi Clips and a Large Medi Pack from the various alcoves. Find the lever on the other side of the cave and use it to open a door just on the left. Swim through it to return back to the pool with the structure. Swim to the southwest corner of the pool and climb on the ledge close to the bridge that connects the land with the structure. Walk on the bridge and take a standing jump over the slide. Jump to the ledge on the left and climb on the ledge above. Go to the right and pick up the Uzi Clips. Inside the structure - Enter the structure and go to the left. Climb up the first two blocks and turn around. Jump to grab the opposite ledge and pull up. Pick up the Magnum Clips and climb on the fleshy ledge. Then drop down to find the two doors you opened before. Both lead to the same room, where a mutant is lurking. Stay at the entrance and kill it. Then climb on the left hand ledge to get a Small Medi Pack. Drop back down and go through the dark hallway. Pick up the two sets of Shotgun Shells on your way and approach the second door that opens automatically. Room with eight mutants in the alcoves - Enter the room. The mutants do not awaken now, so freely pick up the three sets of Shotgun Shells from the ground. Then climb on the low block in the middle of the room (be careful of the lava pits). There are four sets of Shotgun Shells here, but when you pick up the one on the east side, the mutants come into life and they are ready to attack when you step on specific blocks. You need to get it though, because only then the other door in the hallway outside opens. You may find your own way of dealing with the mutants, but here is one that does not require a lot of health loss: Stand on the low block facing south (the wall, where the entrance is). Drop down straight ahead and proceed forwards. When you step on the third square (as shown here), a mutant from the right side awakens, so roll and jump back to the low block. Kill the mutant from here. Again, face south, drop down and proceed forwards to reach the wall, past the pillars. Go to the right, where the entrance is. On stepping on the square in front of the entrance, four mutants awaken. Do not hesitate, turn right and run diagonally to the low block, jumping over the lava pit (as shown in this screenshot). It is important to run diagonally, because you will pass over the squares that awaken the last three mutants. Kill them all from here and if they exit through the doorway, drop down to lure them back and climb on the block again. When all of them are dead, exit to the hallway and go through the other door on the right. The opening on the left leads to a room with two switches that flank the entrance, and four spheres. The switches open the gold door on the other side, but it is timed. The first two spheres explode when you approach the switches, so do this one at a time and kill both mutants. The other two spheres explode only if you approach them, so decide if you want to make a play with them or simply use the switches and run through the door. In the next room, a centaur starts throwing fireballs at you. Start side-jumping whilst shooting at the same time. The spheres in this room do not contain anything, so proceed freely. Go down the steps and the ramp on the other side and pick up the Large Medi Pack and two sets of Uzi Clips from behind the ramp. From the eight spheres, only the four contain mutants: from the right side, the mutants will come from the first and third spheres, and from the left, they will come from the second and fourth spheres. Jump on the blocks and kill them from safety. There is a switch close to the entrance that opens the gold door on the other side. It is timed, so flip it, press the Look button to break the camera, tap back twice, turn left and start running next to the blocks, jumping at the same time to cover more distance. When you pass through the door, you start sliding down a slope and you end up in a pool. Swim through the opening to end the level. (Note - If you start a New Game without quitting, you will have all the weapons with unlimited ammo.)
|
||
| « Level 3: Atlantean Stronghold | Index | |
| We would like to thank Nicky for her help. Many parts of this walkthrough would not have been written without her participation. Last update: 07 Jan. 2007 |
||
Tomb Raider Gold: Shadow of the Cat & Unfinished Business Walkthrough & Game Guide © 2000-2007 www.tombraiderhub.com |
||