Tomb Raider 3 Expansion (Gold): The Lost Artifact Walkthrough & Game Guide
Level 1: Highland Fling
*(The number of pick-ups may vary, depending on if you take the advantage of a friendly bug that appears in the Area with cave beneath. See the Bug note below.)
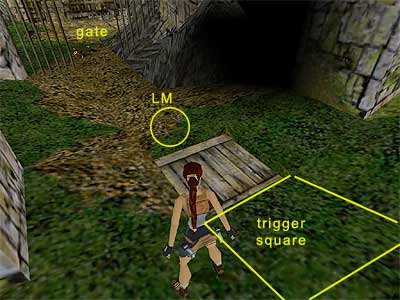
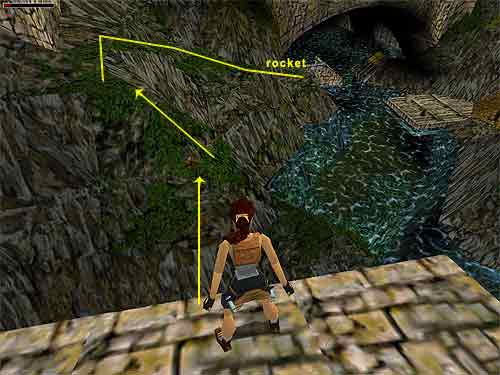
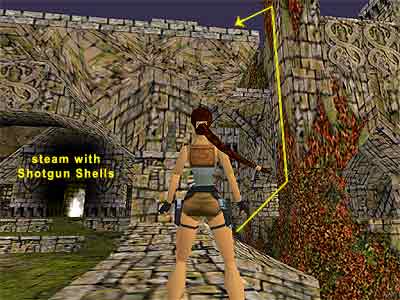
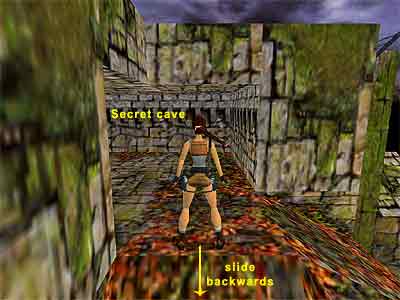
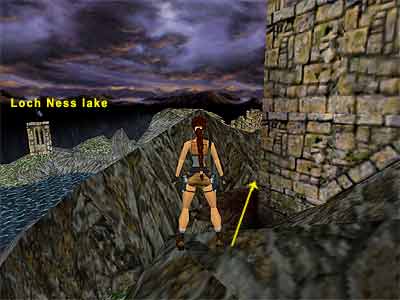
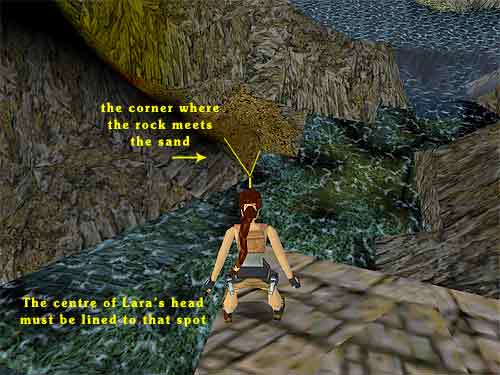
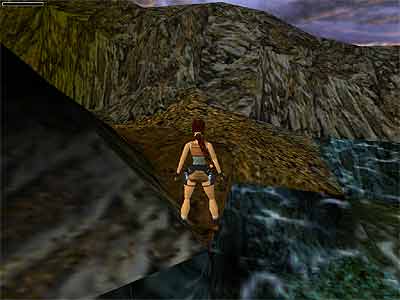
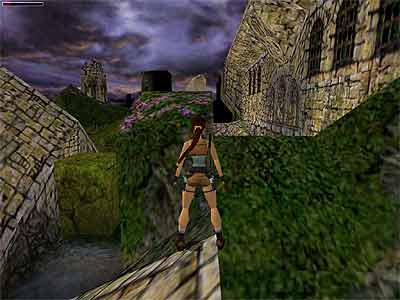
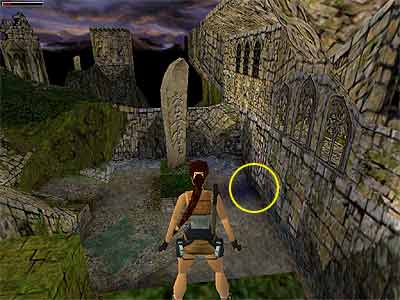
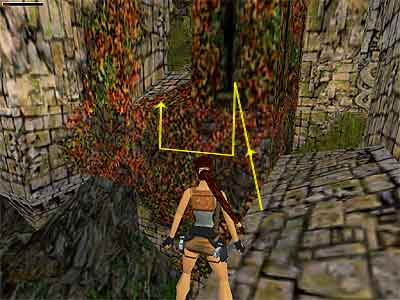
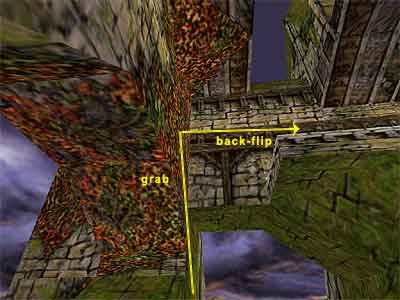
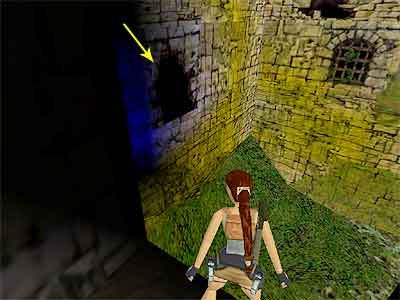
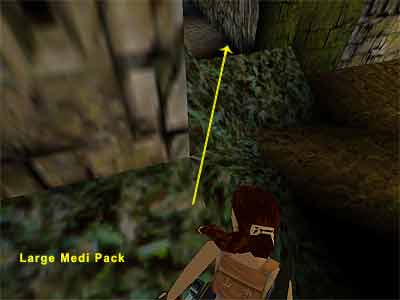
The cut scene shows a helicopter setting down outside a castle in Scotland, dropping Lara. The game begins with Lara somewhere into the castle. Grab the vine-covered wall and climb to the top. Carefully drop down at the other side and approach the pool. Climb on the movable crate and take a diagonal standing jump to grab the vines above. If you cannot grab the vines, pull the crate once, climb on it and jump up to grab the vines. Traverse to the other side and drop down. Pick up the Small Medi Pack. Drop into the pool and swim through the tunnel to reach a lake. The current will push you beneath a bridge, where you can surface. Swim through the rocks to reach a wooden platform on the left. Get the Harpoons beneath the platform and climb out of the water. Turn around and notice the Rocket on the ledge on the other side. Let's go and get it. Getting the Rocket - (The following procedure is shown in this page.) Whilst on the wooden platfrom and facing the Rocket, locate a small triangular ledge opposite to the left. Drop into the water and swim towards it. Swim as close to it as possible. If you try to climb up to it, you will see that it is impossible: as you press Action, you will see Lara acting strangely and hear small splashes, but this is exactly what we are going to take advantage of. Facing that ledge, look to the left. There is another sloped ledge there. Turn to face that sloped ledge and swim close to it, facing its middle part. Make sure Lara is sticking to the underwater part of the ledge and press Jump. Lara will dive in the water, but because she will collide on solid land underwater, she will try to stand on it. Immediately as you see her trying to stand up, press Jump together with the Down direction arrow. If you did everything right, Lara will do a backflip and land just at the corner of the triangular ledge. Now you can turn around and jump on the higher ledge ahead, then to the green rocks a bit to the left and from there to the long green ledge with the Rocket. After you grab the Rocket, drop in the water and climb on the wooden platform. (Note: You will have another chance to get the Rocket later, so do not worry if you cannot do it now.) Area with cave beneath - Go up the path until you reach an opening on the left. Go through it and up the ramp. There is a guard standing on the right, but let him open the gate on the left and release a dog. Kill both and pick up the Flares the guard dropped and the Shotgun Shells at the top of the ramp. Go through the gate and pick up the Large Medi Pack. Go down the ramp, cut to the right and crawl through the opening to enter a cave. Pick up the Flares from the alcove on the right. If you want all the kills, continue into the cave and crawl through the opening. At the end you will find a switch that opens the nearby trapdoor. Climb through it to get back to the area you got the Medi Pack and kill the dog that attacks. (Bug note - Here you can take the advantage of a friendly bug and collect as many Large Medi Packs as you want. To do that, save you game and load it. It does not matter if you save in this area with the trapdoor or outside. Once you load, step on the square that opens the gate, as shown in this screenshot. Normally, the gate should be open by now, if you have followed this walkthrough to the letter. Once you do that, the Large Medi Pack magically re-appears on the same spot! Thanks to JasonDavies15, who let us know about this bug.) [Note – If you want the less damage with the guard and the dog, after going up the path, do not enter the opening on the left. Instead, continue to the end and climb on the block in the corner, to the left of the bridge. Take a diagonal standing jump to grab the wide opening and pull up. This way you will trigger the guard and the dog from a safe area. Also, if you killed the guard before he opens the gate and you want the Medi Pack, enter the alcove as described above and use the switch to open the trapdoor. Or, go up the path, but do not approach the ramp. Instead, run straight ahead and enter the cave. Pick up the Flares and flip the switch to open the trapdoor. Climb up and you will be attacked by two dogs - the one you would meet anyway, and the one that would attack along with the guard if you had followed the path described in the previous paragraphs. The gate will not open now (unless you step on the trigger square, as shown here), so go back down the dark passage to get to the side of the ramp and this time go up the ramp. You will meet only the guard now, which will make your task a lot easier.] On the bridge – Go through the opening opposite the gate and approach the wide opening on the right. Drop to the left ledge and walk to the end. The camera shows a guard patrolling around. Kill him from here or take a diagonal standing jump to the bridge and finish him off. Pick up his Shotgun Shells and some more from the left hand side of the bridge. When you get the last Shells, the camera pans back and shows Lara from a distance. Walk towards that part of the lake and use the Look button to see the Loch Ness monster, moving from the left to right. If you take a look on the left and behind the rocks you can see something shiny. This is a pair of Uzis and it is tricky to get them. Do not try from here, because you will lose health. More than that, you will start backtracking which is a waste of time. Wait until you get the Uzis later. For now, go to the end of the bridge where the two dog statues are and kill the crow that attacks. Beyond in the pit with the steam you will find some Shotgun Shells. Second chance of getting the Rocket - If you were not able to get the Rocket before, here is a second chance. Approach the extended ledge on the right hand side of the bridge (facing the two dog statues) and take a running jump to the (almost) flat greenish rocks below (as show here). Keep the bridge to your back and take a standing jump over the slide to land at the top of the rocks on the left hand side. Follow the flat ledges around and take a running jump to land on the ledge next to the Rocket. Pick it up, jump into the water and make your way back to the bridge the same way as you did before. 1st Secret – Go to the right side of the bridge and walk on the ledge next to the dog statue (as shown here). Jump to grab the vine-covered wall and quickly back-flip because a crow attacks. Kill it and grab the wall again. Climb up it and back-flip to the ledge behind (or dismount to the left). Go to the other side of the roof and kill the guard and the crow. Climb into the opening above and pick up the Shotgun (loaded with two Shells) and two sets of Shells for it. Exit, but do not jump to the roof. Instead, slide down the vines to the right backwards (as shown here), pressing Action to grab the edge. Traverse to the either left or right and climb down the vine-covered wall. Slide close to the pool behind the wooden breakwater and climb on it to get a Small Medi Pack. Climb to the top of the rocks close where you climbed down (take standing jumps to clear the slides) and facing the way where the Loch Ness monster appeared, take a look to the right behind the wall. There is a flat ledge there (as shown in this screenshot), so take a running jump, pressing the right direction key whilst in midair. Pick up the Harpoon Gun and the Harpoons. Now it is time to get the pair of Uzis you saw from the bridge. It is a bit tricky, but possible. Have in mind that if you cannot do that, you can use an alternative way, but you will lose health. Getting the Uzis - Turn to face the water (the direction of the Uzis). Take a running jump - or slide down the rocks in front of you - to land in the water. There is a very strong current here, but if you keep pressing Jump, Lara will be swimming towards the extended square of the shore where the Uzis are. Try to keep her swimming at a straight line, and as she approaches the corner of that square, press together Jump, Action and the Down direction arrow. If all goes well, Lara will shoot up in the air and end up standing safely on the square of the shore. Pick up the Uzis. [Alternative method for getting the Uzis - Go back to the bridge and stand on the ledge that looks the way of the Loch Ness Monster. Walk to the front left corner of the extended ledge and notice the corner (the L shape) the sandy land creates. With a good running jump you can land on the left hand side of the corner, just on the spot where the rocks meet the land. Position Lara in the front left corner and using the Look button, aim for the spot where the rocks meet the sand. The center of Lara's head must be lined to that spot (see this screenshot to get oriented). Make sure you have 100% of health (you will be left with just 10%) and take a running jump, pressing Action in midair, to lower Lara's arc and avoid dying whilst landing. Important: Press Action at the beginning of the jump and not at the end. Lara will land just in the corner (as shown here).] Going back to the bridge - Jump into the water. The current will push you back and beneath the bridge. Look for some Harpoons on the left and two more trines on the shore to the right. Climb to the wooden platform, as before, and go up the path. Pass the two openings and climb on the block on the left, beneath the wide opening. Take a running jump to the opposite ledge and jump to the bridge. There are two closed gates behind the dog statues and it does not matter which one you follow first. But since you need to get something from the right hand side in order to use in the left area, go to the right gate first to avoid backtracking. Right gate – Go to the right and, before jumping over the gap, kill the guard that is patrolling beyond. Jump over the gap and go to the end. Drop into the pool and get the two trines of Harpoons and Crowbar. When you get the latter, the camera provides a hit of its usage. At first, you see a guard, but if you are careful, you will see a dog statue and gate behind it. Climb out of the water and go up the stairs. Here is the switch that opens the right hand gate. It is timed, but you have enough time to make it, so do not panic. Use it, press the Look button to break the camera that shows the gate opening, side-flip to the left and over the slide, turn left, run and jump over the gap, cut to the right and go through the gate. Draw weapons and kill the guard from the right, who is hiding behind the boxes. Once you are done, pick up his Small Medi Pack. In order to get the 2nd Secret, you need to be careful (and rather quick). 2nd Secret – There is another guard in the next area, but do not kill him yet. Let him open the gate behind the dog statue and quickly go through it (probably whilst shooting at him). Finish him from inside, because the gate closes after a few seconds. Use the Crowbar to open the wooden door and enter the tomb. Pick up the MP5 Gun (loaded with one round of Clips) and two sets of Clips for it. Exit and crawl through the opening on the right hand side. The gate opens as you approach and the first burner turns off, so you can exit safely. (Note – Unlike to TR3, you are not able to pick up the Crowbar again.) If you enter the graveyard with your weapons holstered, the camera will point Lara from above, showing a ledge at the top of the area. If you wait for a bit, a guard will come from the left, so kill him and pick up his Shotgun Shells. Do not go where the guard came from. For now go to the right, having your weapons drawn. Another guard will attack here, so take care of him. Pick up the Shotgun Shells at the bottom of the steps and go to the left behind the column where you will find a Small Medi Pack. The swamp is deep and the opposite vine-covered wall is not climbable, so do not waste your time here. Return to the graveyard and go from where the first guard came. The path will lead you to a slide, so be careful not to drop into the swamp. Take a diagonal standing jump to the pillar on the right and turn right. Move to the higher part of the pillar and take a standing jump to the right hand side of the next pillar (as shown here). Avoid the left part because you will slide into the swamp. A crow attacks, so quickly kill it before it pushes you into the swamp. If the crow keeps pushing you into the swamp, as soon as you land on the second pillar, take a couple of steps forwards to reach the middle of it and back-flip to the first pillar. Turn around, jump back to the ground and kill the crow from there. Take a look on the wall to the right. There is a tile with a shield close to the barred window. There is an opening exactly below and you may not be able to see it from here (this screenshot shows the location). Take a running jump towards the shield tile and keep pressing forward, moving to the opening. Lara's head will sink below the swamp, but she will be fine. Enter the opening and walk out of the swamp. Crawl through the opening to reach a T-junction. (Alternatively, after you kill the crow and supposing you are standing on the pillar with the purple flowers, look to the left. There is a green block attached to a pyramid-like structure. Take a standing jump there and turn slightly to the right. Locate a small trinagular ledge down below and to the left and jump there. Now jump in the swamp and start walking. Try to stay as close to the left wall as possible, and even if you see Lara's head disappearing and her breath bar showing up, do not panic - keep moving. Eventually, she will emerge again, and soon enough you will find yourself before the opening below the shield. Press Action to climb on the ledge just in front of the opening and go inside.) Opened misty area with central pillar and rocks – Go to the left to reach a misty area with a central pillar. There are various pick-ups on the crates, but when you pick up the Large Medi Pack, the two dog statues awaken. So, be alerted and kill both. Pick up the MP5 Clips, the Shotgun Shells and the Flares and return back to the crawlspace. As you enter, crawl to the left (the right hand side leads to the swamp you came from). Follow the passage and crawl through the next opening to reach a ledge above the swamp next to the graveyard. Climb up the next two ledges and pick up the Small Medi Pack. When you do that, the camera shows Lara from a distance. This is where you need to go in order to exit, but first climb into the alcove with the steam and pick up the Thistle Stone #1. Jump up to grab the vines and traverse across the swamp. At the end, drop to the ramp to slide to the ledge below. Slide down the next ramp to return back close to the switch that opened the right hand gate. Go to the right and jump the gap to return back to the bridge. Left gate – Facing the dog statues, walk to the ledge next to the left statue and take a running jump to the opening. If you cannot do it, grab the vine-covered wall, traverse beneath the opening and pull up (see this screenshot). The bats are harmless. The switch here opens the left hand gate and, as before, it is timed. When the gate opens, a guard comes out, so do not start running yet. Deal with him first, by standing into this room and if he leaves, slide down the ramp and jump close to the gate to finish him off. For the timed run, use the switch again, press the Look button to break the camera that shows the door opening, roll and run to the opening on the left. Slide down the ramp and jump close to the gate, pressing Action to lower Lara's arc. Run to the left and through the gate. It is possible however to do it all in one run. Flip the switch, press Look to break the camera and run/ slide out of that room to jump to the main section of the castle. Cut to the left and draw your weapons while you are approaching the gate. If you are fast, you will be able to enter the area behind the timed door before the guard starts shooting at you and as he is preparing to get out to face you, so you will be able to get rid of him as he will be turning around to chase you again. Behind the left gate - The openings on the left lead to a switch that opens the gate at the top of the ramp in case you want to return back. For now, follow the opening on the other side. To the right is the exit gate and you need two Thistle Stones to open it. Go to the left and up the steps. The dog statue comes to life when you reach the step in front it. Deal with it or ignore it (for now) by jumping over the slide on the left in order to avoid the trigger square (note though that you will return back from here, so remember this point). Continue up the steps and drop into the cave. Area with big pit in the middle - When you reach the open area, go through the opening at the far left. If you proceed with your weapons holstered, the camera will point Lara from above, showing a guard patrolling on the ledges. Go around the pit and pick up the Flares. Backtrack close to the opening and notice the vine-covered walkway. Walk to the edge of the pit and jump up to grab the vines. As you traverse across, a crow will start flying above. Drop into the opening at the end, turn around and kill it (you may not be able to aim at the crow now. In that case, you will kill it later). Crawl through the opening, stand and turn right. A boulder will roll as soon as you pass the opening you came from. To deal with it, side step to the right and stick to the wall. Crouch and start crawling, pressing the right direction key at the same time. Do not stop even if you see the boulder coming towards you. It seems you do not have much time to do it, but if you do not hesitate at all and do not let go of the Crouch and Right buttons, you will make it to the next opening, seeing the boulder passing over Lara!! Once you make it, crawl back out and continue to another crawlspace. Go through it and climb up the block to reach the ledges where the guard is (if you did not kill the crow before, do it now). To take care of the guard, stand against the block on the left and start jumping up, shooting at the same time. Climb on the block and pick up the Small Medi Pack from the alcove on the left. Go through the opening and turn right. Take a running jump to grab the opposite ledge and pull up. Or, as soon as you go out to the first ledge, turn around so as to face the inside of the ruined castle. Step close to the exit and jump up to grab the vine-covered wall. Traverse all the way to the left and upwards where you meet the arch, and when you reach the other ledge below you, let go of the vines and jump down. Go to the right to enter the previous area again and turn around to face the way you came. Jump to grab the vine covered-wall and back flip onto the ledge behind (as shown in this screenshot). Take a running jump to the ledge at the middle of the area and draw weapons. Kill the crow that attacks from the alcove on the right, enter the alcove and pick up the MP5 Clips. Exit and walk almost to the end of the ledge. Take a running jump to grab the next alcove and pull up. Pick up the Small Medi Pack and take a running jump back to the ledge. Stand on the raised part of it and jump up to grab the edge of the roof. Pull up and approach the steam where the Thistle Stone #2 is. A crow flies from below, so back up a bit and kill it. Then pick up the Stone. Return back and drop through the opening and onto the ledge you came from. If you want to end the level now, take a running jump to the wide green opening and slide to the steps where the dog statue was. That way you will miss the level's final Secret (skip to the Heading to the exit below). If you want it, hang from the edge and drop to the walkway below. Go to the end and take a running jump to the opening on the right. Pick up the MP5 Clips. 3rd Secret – Walk up to the edge of the opening and take a look on the left. There is an opening that looks like a window (as shown here). Take a standing jump there, pressing Action to lower Lara's arc, or take a simple running jump. Once you pass through it, you will land on a slide and finally drop on a pillar. Turn around and drop backwards to land at the bottom of the pillar where you will find a Large Medi Pack (no, this is not the Secret). Jump towards the cave to the right of the pillar (as shown here). If you drop into the swamp, the Loch Ness monster will appear and you will drown Lara. Enter the cave to hear the chime signaling the Secret. Wave through the swamp until you reach the clear water. Swim to the bottom and to the right where you will find some Flares. Continue through the cave, staying on the right as you climb out of the water. The Loch Ness monster will pop out from the left, breathing fire. When it takes a breath and raises its body, jump into the water below its neck and follow the twisted tunnel until you can surface. Swim to the left where you will find another opening. Swim through it to surface again. You can see the guard patrolling in the control room. Climb onto the ledge opposite that room and kill the guard from there. Pick up the Large Medi Pack and enter the control room. Pick up the Grenades and use the switch to open the gate. Go through it having your weapons drawn because a dog will attack here. Continue up the steps and start climbing up the blocks. Grab the back side of the slope, pull up and slide to the steps where the dog statue was (be careful if you avoided the dog before). Heading to the exit – Go down the steps to return to the exit gate. Place the two Thistle Stones to the snake receptacles to open the gate. Go through it, pick up the Flares and slide down the ramp to end the level.
|
||
| Index | Level 2: Willard's Lair » | |
| We would like to thank Nicky for her help. Many parts of this walkthrough would not have been written without her participation. | ||
Tomb Raider Expansion: The Lost Artifact Walkthrough & Game Guide © 2000-2007 www.tombraiderhub.com |
||