Tomb Raider 3 Expansion (Gold): The Lost Artifact Walkthrough & Game Guide
Level 2: Willard's Lair
*(40 if you choose to follow the Second alternative path.)
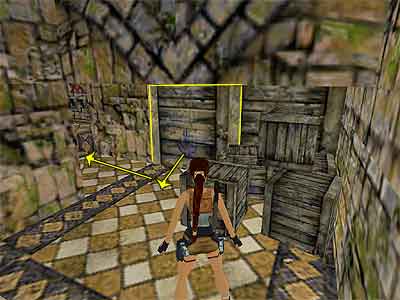
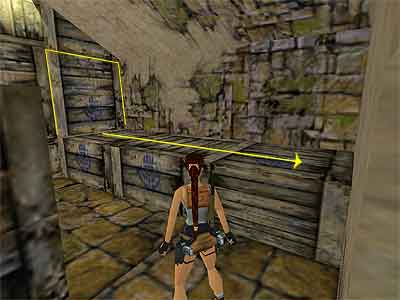
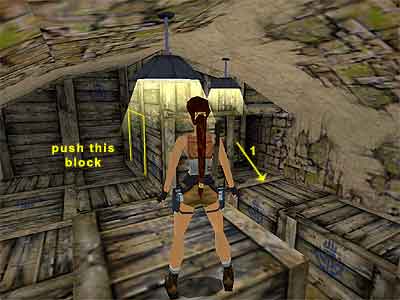
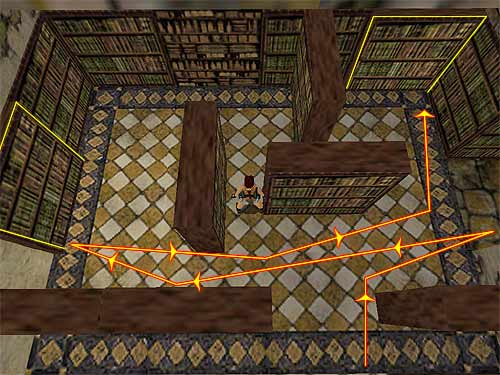
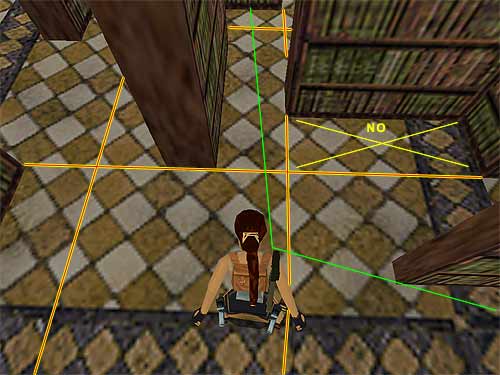
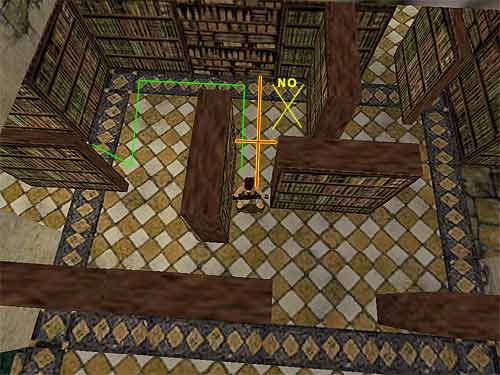
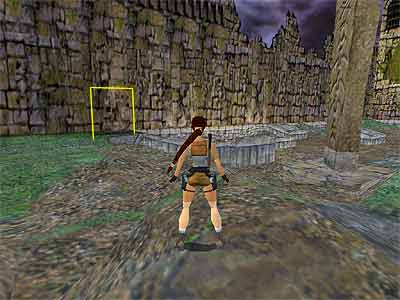
When the level begins, the camera shows a warrior, but do not worry about him now. Although you slid down the ramp at the end of the previous level, do it once more. You land above some Flares, so quickly pick them up and jump forwards to avoid the spiked walls. Keep pressing the forward key, until Lara jumps over the back side of the ramp beyond. You start sliding again, ending on a passage with a rolling boulder. Quickly turn left (to face the way the boulder is coming from), jump backwards once and hop back pressing Action to grab the edge. That way, the boulder will pass over Lara's head. Pull up and pick up the Crowbar. Alternatively, turn so as to have your back to the boulder rolling behind you. Stand there waiting for the boulder to approach. Just as it is approaching, but before it touches Lara, perform a backflip. Hopefully Lara will jump over the boulder, losing a tiny bit of health. The boulder will roll below Lara as she is in the air and she will land safely after it has passed by. (Note – The Crowbar will give you the access to the level's 2nd Secret. Make sure you get it now. Once you drop into the lower room, you will not be able to come back.) Go up the passage where the boulder rolled from and crawl through the opening. Jump into the water and get the three trines of Harpoons (or the Harpoon Gun instead one of the trines if you do not have it). Climb out of the water and return to the passage. Walk to the edge. If you followed the above way in order to avoid the boulder and hanged above the spikes, you should now see a dog lurking below. If not, hang from the edge to trigger it. Kill it from here and take a standing jump to the left hand side of the green ledge ahead. Drop to the ground and crawl in the passage to avoid the spike trap. Pick up the Small Medi Pack and again crawl to avoid the next spike trap. Cave with rolling boulders – The boulders here roll from different directions and some are triggered by stepping on more than one square. The deal is to reach the far right opening, trigger a boulder that blocks the exit and leave. There are some pick-ups around the cave and here is a possible route to get them without injury. Before trying though, you may want to save your game. If you need a visual guidance, see this page. The first two boulders do not roll now, so go down the steps and enter the cave, lining Lara to the Shotgun Shells (two squares away from them). First, side-step to the square on the left hand side to trigger the boulder that is front of the column on the left, allowing it to pass over the Shells. You still have the entrance to the back of you, so step on the square ahead to trigger the boulder from the right and hop backwards to avoid it. Again, step on the same square ahead, then onto the next one to trigger another boulder that it will not come towards you. Turn right to face the Shells (the entrance must be on your right now), step on the square of the Shells and hop back to avoid the boulder from the left. Pick up the Shells. Turn around and walk towards the column. Turn right (the column is on your left now) and run to the other side to trigger the boulder that blocks the exit. Now freely go and get the Rocket. When you step on that square, another boulder rolls, but it is not on your way. Go and freely get the Desert Eagle Clips from behind the column. Run to the exit without stopping, because a boulder comes from the right. Enter the alcove on the left and pick up the Grenades. When you pass the alcove, another boulder rolls from above, so turn left to avoid it. Go up the steps. There are three spiked wall traps beyond. The way you will get passed them will open a different route for you. There are two possible ways to do it and therefore two possible routes throughout the level. You will be able to explore both of the parts of the level though if you want. If you are interested in all pick-ups, you must follow the First alternative path, as you will get a Medi Pack that you cannot get through the Second alternative. First alternative path. Spiked wall traps – Save your game here, because the next part is quite tricky. Position Lara on the right hand side of the ramp and slide down. A spiked wall starts moving from the other side, so quickly turn right and climb onto the upper ledge. A second spiked wall is moving towards you, so move ahead and climb onto the third ledge, picking up the MP5 Clips if possible. When you reach the third ledge another spiked wall starts moving from the left. Quickly go and use the switch ahead to open the gate on the right. Go through it and… Phew!! You just missed the 1st Secret, but you will get it later if you want. Go to the right and drop into the pit where you will find a Large Medi Pack. Climb back out and go up the steps. There are three openings on the left hand wall. Slide down through the third one to drop onto a wooden platform. Draw weapons and kill the four crows that attack. Do not cross the platform or the rubbles will fall from above. Instead, jump to grab the L shaped ledge, pull up and pick up the Flares. Walk to the end and drop off the ledge and onto the platform. Jump to the doorway with the Small Medi Pack and pick it up. Walk back to the other side of the platform and take a diagonal standing jump to the part of the platform you slid before. [Alterrnatively, you can slide down the middle opening, but make sure you jump at the end, in order to land on the wooden platform and not end up dead in the toxic filled pit. If you remain standing at the spot where you land, you will not trigger the rubble, so make sure you kill the crows from there, only moving around on the spot - if it is absolutely necessary (usually, if you follow this path, only the two crows attack at this point). Then turn to diagonally face the alcove where the Medi Pack is and run straight to it without stopping. The rubble will start to fall, but you should not have a problem if you keep running. Once you get the Medi Pack, turn around and run back to where you landed after the slide, but do not stop - keep running until you reach the far (and safe) end of the platform (below the last opening/ slide). Just then, the third crow will attack, so kill it. Jump to grab the slanted white ledge where the Flares are, and be alert as the fourth crow will attak from high up.] Making your way up – Jump to grab the L shaped ledge and pull up. Or, jump up and grab the sloped ledge opposite to it and as you pull up, back-flip to the L shaped one. Then jump to grab the upper flat ledge and pull up. Climb onto the low block and follow the walkway around to the right. Take a diagonal standing jump to the wide opening (you may need to press Action to lower Lara's arc) and quickly jump back to the walkway. Draw weapons and kill the dog whilst it runs around. Then jump to the wide opening again. Avoid the grated and right hand part of the area here, because the rumbles from above will fall down. Go to the left and grab the vine-covered wall. Climb almost to the top and dismount onto the ledge. If you want the 1st Secret that you missed before, you can go and get it now. On your way you will get some pick-ups and then return back here. If you are not interested, climb into the opening and skip to the part of the walkthrough Entering into the Library at the Second alternative path below. Otherwise, continue with the walkthrough. Follow the walkway close to the dog statue (it does not come to life) and jump to the ledge on the left of the opening. Climb up the block and use the switch to lower a spiked wall in an area you have not been in yet. You must use this switch because it opens your way to the Secret. Return back past the dog statue and climb into the opening next to the vine-covered wall. Turn left and take a running jump to the opposite ledge. Climb on the block and take a diagonal standing jump to grab the wall on the right. Climb nearly at the bottom and hang just above the spikes. Traverse to the either left or right and drop onto the ground, just outside the spikes. Walk through them, heading to the other side of the passage, where you can find some Flares. Pick them up and then return back. Pits with spikes – Climb on the ledge that has the sign "Abandon hope all ye who enter here" at the back side. To get the Small Medi Pack in the first pit, line Lara to it and walk up to the edge. Take two steps backwards, then a standing jump and you will land exactly above it. Quickly pick it up because the spiked ceiling has already started descending. Roll, run and climb onto the ledge you were before. Now take a standing jump to the opening on the left (if you face the pit). If you used the switch before, the spiked ceiling should be down and you can take a running jump over it and land in the next opening. Make sure you jump from the middle where the highest part of the arch is. Proceed to the next pit. Here, you can see the Shotgun Shells and you can get them with the same way. Line Lara to the Shells and walk up to the edge. Take two steps backwards, then a standing jump and you will land exactly above the Shells. Quickly pick them up, turn left and climb onto the ledge to avoid the spiked ceiling. Now you need to decide whether or not you want to spend a Medi Pack. A spiked ceiling has already started descending in the next pit and if it passes the level you are on and finally stops at the ground, you will need to get a Medi Pack in order to get the Secret. There are two Shotgun Shells on the ledge to the left. If you want them, jump to the ledge and pick them up. Then fall through the spiked ceiling, feeding Lara with a Medi Pack. Quickly crouch, so as not to touch the spikes. If you do not want to spend a Medi Pack, drop into the pit before the spiked ceiling reaches your level. In both ways, crawl through the opening and drop down on the other side. You are back in the spiked wall traps. Crawl backwards to drop to the lower ledge. Pick up the two trines of Harpoons and use the switch to open the gate on the upper ledge. 1st Secret – Again, crawl backwards to the lowest ledge and pick up the Large Medi Pack and the MP5 Clips (or the MP5 Gun if you do not have it). Climb to the topmost ledge where the gate is and exit to the wooden platform. If you did not trigger all the crumbles before, be careful now. You need to make your way up again, through the L shaped ledge. Once you reach the area with the grated floor, climb up the vine-covered wall, dismount on the ledge and climb into the opening. Turn left and take a running jump to the opposite ledge. Climb on the block to find yourself next to the climbable wall that led you to the spikes. Continue with the walkthrough below, Entering into the library. Second alternative path. Spiked wall traps – Save your game here, because the next part is quite tricky. Position Lara on the right hand side of the ramp and slide down. A spiked wall starts moving from the other side, so quickly turn right and climb onto the upper ledge. A second spiked wall is moving towards you, so move ahead and climb onto the third ledge, picking up the MP5 Clips if possible. When you reach the third ledge another spiked wall starts moving from the left. Once you pull up, move a bit to the left and climb down to the second ledge (stand with the opening to your back and press Crouch + Action + Down). The spiked wall on the second ledge has already moved to the right, so you will not have a problem. Pick up the two trines of Harpoons and use the switch to open the gate at the topmost ledge. 1st Secret – Drop onto the lower ledge and pick up the Large Medi Pack and the MP5 Clips (or the MP5 Gun if you do not have it). Climb to the top ledge and go through the gate you just opened to get the Small Medi Pack. You need to make your way up and you can do it by either following the ledges here outside or going through some pits with spiked ceilings. It does not matter which one you take, as both leads to the same place. If you want to see everything and explore the other area, you can do so. Choose the way you like and then follow the walkthrough at Entering into the library below. Following the ledges outside – Carefully step on the wooden platform and let the crumbles fall just next to you. Walk to the other side and take a diagonal standing jump to the part of the platform on the right hand side of the L shaped ledge. If you approach the slide on the wall, two crows will attack. Two more crows appear when you move a bit to the right (as you face the slide). Jump to grab the L shaped ledge and pick up the Flares. Now refer to the walkthrough at Making your way up above (First alternative path). You can visit the pits with spikes as described above or totally skip that part and enter the Library. Through the pits with spikes – Climb into the opening with the "Abandon hope all ye who enter here" sign. Crawl forwards and stand. A spiked ceiling has started descending, so quickly turn around and jump to grab the edge of the slide. Pull up and jump pressing Roll to twist in midair. Grab the ledge behind and pull up. Turn around and wait for the spiked ceiling to stop. Then jump to the ledge on the left and pick up the two Shotgun Shells. Jump back to the previous ledge and approach the next pit. To get the Shotgun Shells, line Lara to them and walk up to the edge. Tap back once and take a standing jump to land exactly above them. Quickly pick them up, turn right and climb onto the ledge to avoid the spiked ceiling. The next spiked ceiling lowers as you approach. Take a running jump over it, jumping from the middle where the higher part of the arch is. To get the Small Medi Pack in the next pit, run off the ledge, pick it up and quickly climb on the ledge to the right to avoid the spiked ceiling. Carefully drop into the passage below and Walk through the spikes, heading to the other side where you can find some Flares. Back-track to the first set of spikes and stand against the vine-covered wall on the right. Jump up to grab it and climb to the top. Dismount on the ledge. If you want all the pick-ups and kills, you need to visit the area outside where you would have passed by Following the ledges outside (if you are not interested, skip to the Entering into the Library below). In order to do so, drop onto the lower block and take a running jump to the opposite ledge. Drop through the opening and onto the walkway below. Beyond the dog statue, you can see a switch, but it is useless now. Turn to the face the opening you came from and take a diagonal standing jump to grab the vine-covered wall. Climb to the bottom and turn around. Avoid the grated part of the floor because some rumbles will fall down, and move to the right, towards the opening. Quickly jump to the ledge on the right and turn round. Kill the dog and follow the walkway around. Drop onto the L shaped ledge and pick up the Flares. If you want all the kills, you need to go down. Jump to the wooden platform and approach the slide. Two crows will attack and two more appear when you move a bit to the right (as you face the slide). Once you are done, make your way back the same way you came. Entering into the library – You should now be standing on a ledge, next to a vine-covered wall with spikes at the bottom. Stand with this wall on your left and walk to the edge of the ledge. Jump up to grab the upper ledge and pull up. Jump to the next ledge and then climb on the next block, which is next to the Library entrance. Before entering, turn around and take a running jump to grab the ledge ahead. Pull up and pick up the Uzi Clips. Then jump back to the Library entrance. Into the Library – A guard is patrolling in the next room with the big opening in the floor. Kill him and if you can, kill the other two guards at the bottom. Continue to the other side and go through the opening on the right. Before going down the steps, jump into the alcove opposite the way you came from and crawl through the opening. When you are able to stand, turn around and climb up the two blocks. Pick up the Small Medi Pack and do not proceed further. This opening is a long drop down. Instead, make your way back the same way you came (if you take a look through the barred window close you got the Medi Pack, you will recognize the area from the first level). Go down the steps and finish the guards if you did not do it before. Then pick up their Small Medi Pack and Flares. Vault onto the low table with the maps and pick up the Cairn Key. Go to the left hand side of the room where the small crates are. Locate the movable crate next to them and pull it once (as shown here). Go around the column, to the left side of the crate and pull it once to reveal a wooden door. Use the Crowbar to break the bar and open the door. Inside you will find a second movable crate. Pull it to get the MP5 Clips beneath. Vault onto the wooden ledge on the right and pull the movable crate from the stack twice to reveal an alcove (see this screenshot). Go to the backside of it and push it towards the wall. Pick up the MP5 Clips from inside the alcove. 2nd Secret – There is another movable crate just in front of the Clips you just got. Pull it once and then go to the left side of the stack. Push the last movable crate where the previous was and pick up the Large Medi Pack (see this screenshot to get oriented). Return back to the library. Bookshelves puzzle – When you enter the area with the bookshelves, the camera shows Lara from above and the first thing you can see is an alcove on the right. There are also two "secret" doors – one in the far right corner and one on the left side of the area. First, enter the alcove to open the left door. Go towards it and as you approach it, you will hear another door opening. It is the one in the far right corner as described above. So, return close to the alcove and you will see the door open (see this screenshot for the correct path). Go through it and pick up the two Shotgun Shells. When you step on the square where the second Shells are, you hear a third door opening. This door is behind the first one (to the left side of the area) and you must be careful of the path you need to follow in order not to close it. Once you get the Shells, exit from the left side of the door (you can exit from the right side as well, but you may accidentally step on an anti-trigger square and close the door). Once you reach the first part of the alcove, turn right and pass through the two bookshelves that create a T. As you pass through them, make sure you stick to the left one (see this screenshot to get oriented). The right one is on an anti-trigger square. Walk until you meet a bookshelf ahead. Stand against it to make sure you follow the correct path and turn right (as shown here). Go around the perimeter of the bookshelf and enter the first door you opened. In this small room you can see the third door and hopefully open. (Note – Make sure you have got the Cairn Key or you will not be able to get the 3rd Secret.) Radiation cave – Go through the third door and up the ramp. When you reach the top, the door of the Library closes. As soon as you step on the ground with the toxic liquid, a dog attacks from beyond, so take care of it. Go to the left and through the lit opening. Follow the passage and climb on the ledge next to the barred window. Pick up the Shotgun Shells and the Small Medi Pack and return back to the cave. Then go up the steps from the left hand side of the cave. If you do not have the Cairn Key and you are not interested in loading a previous saved game to get it, go to the top of the stairs (jumping over the liquid) and climb on the low wall. Drop to the lower ledge and step off to end the level. 3rd Secret – As you go up the steps, notice the opening on the right hand wall, almost halfway. Climb on it to reach an area that you should recognize from the first level. Go to the left. There is a low square ledge with carvings on it (as shown here). Stand on it and against the wall and press Action. Lara will use the Cairn Key to the receptacle (it is a small hole in the wall). Three warriors will attack, so turn around and kill them. Return back to the steps and go to the top. Another warrior will attack, so back up a bit and kill him. (Isn't it unfair that he can walk on the toxic liquid?) Jump over the liquid, but before retrieving the Secret from the opening on the left, climb on the low wall and drop to the lower ledge. Crawl through the opening on the right (that was blocked by some bars before using the Key) and kill the warrior in the small room. Pick up the two sets of Uzi Clips and the Large Medi Pack. Crawl back out, climb on the low wall and go through the opening on the right to enter the Secret area, which is the first one when you started the game. Carefully drop down and pick up the Uzi Clips as you pass through the opening. A warrior attacks as you enter the misty valley and two more as you proceed. At the end, climb on the greenish ledges to the left where you will find two sets of Uzi Clips (or a pair of Uzis instead of one of the Clips if you do not have them). Two more warriors will attack, so kill them before dropping down. Then go to the other side and drop through the steamed opening. You will need to kill another warrior here. Do that and go up the steps. The helictopter is waiting for Lara in order to get her from the spot it left her, just before entering the castle.
|
||
| « Level 1: Highland Fling | Index | Level 3: Shakespeare Cliff » |
| We would like to thank Nicky for her help. Many parts of this walkthrough would not have been written without her participation. | ||
Tomb Raider Expansion: The Lost Artifact Walkthrough & Game Guide © 2000-2007 www.tombraiderhub.com |
||