Tomb Raider 3 Expansion (Gold): The Lost Artifact Walkthrough & Game Guide
Level 3: Shakespeare Cliff
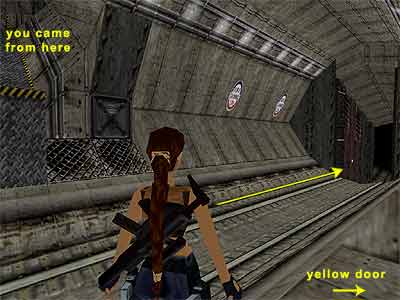
You begin the level outside a factory. This is where the helicopter left you after getting you from Willard's Lair. Turn around and draw weapons. A guard is patrolling beyond, so proceed a bit and kill him. Climb on the yellow box close to the truck and pick up the Flares. Go behind the truck where you will find a closed door. Pick up the MP5 Clips from the ledge to the right of the door and locate the movable blue crate opposite the door. Push it having the truck to your back. Beneath you will find some Desert Eagle Clips. Inside the factory – Use the switch to open the door and enter the factory. A worker attacks here and although he seems friendly, finish him off or he will alert two of his friends, making your job harder. Go to the end of the room and through the opening. Kill another worker here and a third one who comes up the steps beyond, as you proceed further. Behind the machines on the right hand side, you will find a Small Medi Pack. Locate the movable blue crate in this room. Push it towards the grating (as shown here) and pick up the Shotgun Shells beneath. 1st Secret – Positioning the crate on the square in front of the grating, you open the grating itself, revealing an opening that leads to the Secret. So, pull the crate back to its original position to unblock the entrance and enter the small room. Inside you will find some Shotgun Shells (this is not the Secret) and a Small Medi Pack behind the boxes (this is the Secret). Return back outside. (Note - If you decide to go for the Secret before going further down to grab the Medi Pack, the third worker will attack as you approach the Shotgun Shells inside the secret room, so be prepared to shoot him before he becomes dangerous.) Drill area – Go to the other side of the room, but do not go down the steps. Shoot the vents at the far left and climb through the opening. To get past the two sets of burners, stand close to them and when they go off, either run or jump forwards. At the top, you will see an opening and a huge drill. There is a ladder in the front left corner of the opening (as shown in this screenshot), so go around it and stand to that spot. Stand against the wall with the opening to your back and jump backwards, pressing Action to grab the edge as you slide down. The drill starts to descend, so climb down the ladder and dismount on the left hand ledge. Stay in the corner where you dropped on and the burner will not catch you. Wait for the fire to go off and move to the other side. Pick up the MP5 Clips (or the MP5 Gun if you do not have it) and wait for the second drill to descent. Then take a running jump to the opposite side, close to the big moving fan. Use the switch to the side of the block to open a trapdoor behind the fan. Climb on the block and then through the crawlspace. A rat is running towards you, so drop back down and jump up whilst shooting at it. Crawl through the opening again and when you are able to stand, draw weapons and kill a second rat that is coming from behind. Pick up the Small Medi Pack and throw the switch to stop the fan you saw before. Crawl back out and go beneath the fan. Before dropping through the trapdoor, take a running jump to the right where another fan has stopped. Go behind it, climb on the block and shoot the vent. Follow the passage and shoot the next vent. Slide down to land behind a moving fan and pick up the Grenades. Take a standing jump over the slide and make your way back to the trapdoor. [Alternatively, after using the switch that stops the fan, continue crawling to the other side and drop through the opening to land at the bottom of the steps, where the last worker appeared. Turn right and climb on the ledge. Go through the opening (Euro Chunnel Ltd) to find your self behind the second still fan.] Slide down backwards to grab the edge of the trapdoor and release to drop to the wooden walkway below. Go behind the column where you will find some Flares. Then return back and drop to the ground. Be careful of the flaming barrel here. Climb on the ledge at the other side of the area to find yourself at the bottom of the shaft where the two drills descended. Take a running jump to the opposite side and you will hear a door opening. This door is at the upper far left and if you wait for a bit, you will see a guard coming out. Kill him from here. Drop down and approach the right hand side of the area. A worker will sneakily come from behind the column, so back up a bit and kill him. Pick up his Small Medi Pack. Climb on the ledge and go behind the column from where the worker appeared. Climb on the metal walkway above and go through the door that opened before. Head up the ramp, but watch out of the burner at the top. When you get past it, turn around and take a diagonal standing jump on the right hand block (as shown here). Shoot the vent and follow the passage. Climb on the ledge above and continue to a room with grating floor, exactly above the burner. Pick up the Small Medi Pack and the Shotgun Shells (or the Shotgun if you do not have it). Return back close to the burner and go to the left. You will hear the door you came from closing. Train tracks – Slide down the ramp to land on a block above the tracks. The camera will show a gate opening on the left hand side of the tracks. This means that something will come from there. Hang from the edge and drop to the tracks. Turn around and head towards the slide on the other side (where the yellow door is). Quickly take a standing jump over the slide to avoid the train that is coming from the left. Slide back down to the tracks. Facing the yellow door, go to the left (from where the train came). Stay close to the left side and when you pass through the gate, stick to the left wall (as shown in this screenshot). Another train will come but it will miss Lara. Freely move almost to the end of the tracks where you will find a Large Medi Pack. 2nd Secret – You just bypassed an opening on the left (or to the right as you return back). Take a standing jump to clear the slide and pick up the Rocket. Continue to the left of the tunnel and go behind the steam engine. Pick up the Rocket Launcher (loaded with one Rocket) and retrace your steps to the yellow door. Use the switch to open the yellow door. It is on a slow timer, so you will not have a problem to pass through it. Inside you will need to deal with a worker and a guard. Once you are done with them, pick up the Flares the worker dropped. Go behind the yellow box where you will find the Quad Bike (see the controls at the bottom of the page). Ride up the ramps and stop before dropping to the ledge in front of the wide opening. Use the extra boost to get past the tracks and a second pit beyond. Back up a bit and hold down Sprint and Action. Release the Sprint button and keep pressing Action. Lara will do the rest – she will jump over the tracks, ride up the ramp and jump over the pit. Once you jump over the pit and while in midair, release Action and break (Jump button). When you land beyond the pit, press the right direction key to avoid falling into the shaft. Carefully turn the bike so that the fence is to your back. Back up and use the extra boost to jump over the shaft. Continue up the next ramp into the next area. Excavation shaft – Drive over the worker or dismount and kill him. Facing the nose of the train go to the left hand side and use the switch, close to the machine, to open the door of one of the three toilets. To go there, follow the path on the left of the train. The other two doors open as you approach. Kill the worker in the right toilet and pick up the Shotgun Shells. Pick up some more from the left toilet. The one you opened by using the switch contains a computer, but you miss something in order to activate it. Climb on the yellow boxes to the right side of the train (as you face the nose). Drop to the ledge below and notice the worker in the alcove on the right. Kill him before he ignites the barrel on the left. Then climb on the ledge behind the barrel and pick up the Rocket. (Note – If the worker ignites the barrel, take a running jump on the ledge behind, jumping from the either left or right side of the barrel. You will lose a small percent of health because of the heat. Also, this worker appears when you pass from the yellow boxes you climbed up before. If you cannot kill the worker before he ignites the barrel, climb on the train and drop to the ledge in front of the yellow boxes (as shown here). That way, the worker will not appear and you can freely go and get the Rocket. Of course, you will not have the maximum number of kills, unless you climb on the yellow boxes and trigger the worker's appearance.) The objective is to find a Card and open a double gate that will get you to the next part of the level. You can do that either on foot or using the quad bike. Below, we describe both ways until you reach the part where you pass through the double gate. First alternative path\ on foot. [Note – There is a pick-up (Uzi Clips or a pair of Uzis if you do not have them) that you can easily get by using the bike. If you are interested in all pick-ups, you can get that on your way back, when you go after the 3rd Secret of the level. See the next Note after getting the Secret below.] From where you got the Rocket, approach the wooden edge on the left and turn around. Drop backwards to grab the ladder and traverse a bit to the left, then climb to the bottom. Climb on the wooden walkway on the left and pick up the Small Medi Pack. Walk to the edge of the walkway and take a running jump over the gap. Now set up a good running jump to the pile of sand on the left, pressing the right direction key whilst in midair to land behind the support column (as shown here). When you approach the Flares, a guard starts shooting from the ledge on the left. Kill him. Backtrack a bit close to the pile, hang from the edge and drop to the metal ledge below. Pick up the Drill Activator Card and walk back. Jump over the slide and use the switch on the column to open the gates opposite you got the Card. Continue through the opening on the other side and pick up the Grenades next to the ramp. Go up the ramp, jumping over the slope at the top, and slide into the lower area. Move to the left where the barrel is and turn around when you pass through the opening. Kill the worker and climb up the ladder. Pick up the MP5 Clips and draw weapons to kill the two rats that come from the bottom of the steps. Approach the opening there and a guard will show up at the top of the steps. Kill him. You now need to go to the gates you opened by using the last switch. Exit through the opening at the bottom of the steps and drop to the pile of sand next to the slide (as shown here). Walk up to the corner of the slide and locate the small triangular ledge below (as shown in this screenshot). Aim that ledge, tap back once, take one step forwards and take a standing jump to land on the triangular ledge. Turn left, and jump to the open gates. (Skip to the part Behind the gates below). Second alternative path\ using the quad bike. After getting the Rocket, return back to the nose of the train. Get the bike and (as you face the nose) drive up the ramp on the right. Jump the bike on the train and break whilst pressing the right direction key to avoid falling down. You need to jump over the deep pit and land on the rubbles ahead. You do not need the extra boost, but line Lara to the right hand side of the rubbles. Once you land there, quickly cut to the left because the bike is still moving, even if you broke. You will run over some rocks and finally land on a ledge next to a support column (this screenshot shows the route). Dismount and pick up the Uzi Clips (or a pair of Uzis if you do not have them). To leave is quite tricky and it may take you many times. You need to run over the rocks from where you came, but instead of trying to get to the rubbles, you need to drive through the opening on the left (as shown here). Keep pressing Action even if you see the bike sliding backwards and make sure you stick to the left hand wall as much as you can. [Note - If for some reason you cannot do that and you keep falling down, you can still go on foot. Approach the rocks and stand in the corner facing the back side of the rubbles. Take a running jump to grab it and pull up to slide on a flat ledge (this screenshot shows the procedure). Then jump to grab the ladder close to where you got the Rocket and refer to the walkthrough at the beginning of the First alternative path\ on foot.] Once you make it, cut to the right to avoid the flaming barrel and drive down the tunnel. You will hear a dramatic music and a guard running behind the fence. When you reach the wooden walkway, dismount and pick up the Small Medi Pack. Ride the bike again and jump over the gap (over the crashed train). Carefully drive over the rocks on the left to reach the ledge behind the support column. Dismount and pick up the Flares. Then kill the guard that is standing on the ledge above the slide. Get the bike again and carefully drive over the slope beneath the ledge that the guard was standing to reach the opposite side. The guard you saw behind the fence earlier may have reached the opening here. Run over him or in another case dismount and kill him. Pick up the MP5 Clips from the steps and draw weapons to kill the two rats that appeared when you got the last pick-up. Climb down the ladder to the side of the steps and draw weapons. As you approach the opening at the bottom, a worker attacks. Take care of him and enter the tunnel (if you drop down here with your bike, the worker will not appear). A guard is lurking above the ramp on the opposite side, so kill him from here. You need to reach that opposite side and you can do that either on foot or using the bike. If you want to jump with the bike, you need to take a good run up and use the extra boost. If you cannot do that and want to go on foot, approach the pit and notice the wooden ledge on the left (on your side). Jump there and then jump to the next triangular flat ledge. From there, jump to the metal ledge. Pick up the Drill Activator Card on the left of the metal ledge and the MP5 Clips the guard dropped. Use the switch on the orange column to open the double gate, but before proceeding there, go through the opening opposite the switch and follow the passage where you will find some Grenades. Then return back, ride the bike and jump over the gap to land behind the gates. If you do not have the bike, take a running jump to the small triangular ledge on the left and then jump towards the gates. Behind the gates – Go towards the fence ahead and climb on the ledge to get the Small Medi Pack. Backtrack and go through the opening where the flaming barrel is. Climb through the opening to reach a room with a huge machine. Two workers will attack – one from the left and one from the right. Kill both and pick up their Small Medi Pack and Flares. Then go to the right hand side of the area where the portable blue toilets are. Pick up the Uzi Clips and kill the three rats that appear. Climb on the ledge to the back of the machine (to the side where the toilets are) and use the switch to turn it on and open a trapdoor on the walkway at the middle of the machine. Drop through this trapdoor and to the lower ledge and use the Card to activate the drill which digs one of the walls outside. So, exit and go through the opening the drill created. Drop through the hole and slide down the ramp. Kill the two rats and use the switch into the alcove to open the gate across the gap. Take a running jump to grab the edge of the opening where the gate just opened and pull up. Pick up the Pump Access Disk. The camera shows the three toilets you saw when you first entered this area, providing a hint on where you need to go. This will help you claim the level's final Secret, but if you are not interested, follow the passage to end the level. 3rd Secret – Turn around and take a running jump to grab the ladder and climb to the top. Take a standing jump to the tunnel on the left and go through the opening close to the barrel. Climb up the ladder and go to the left. Drop to the gray ledge and climb up the ladder. When you reach the top, traverse to the right and climb on the ledge where you got the Rocket. Drop to the ledge where the barrel is and go to the far right. Jump to the ledge next to the train, climb on it and proceed to the toilets. Use the Disc to the computer to turn on the pumps and fill the pit with water; exit. [Note – If you explored the level on foot and the bike is still at the top (close to the nose of the train) you can get the Uzi Clips (or a pair of Uzis if you do not have them) before dropping into the pool. Refer at the beginning of the Second alternative path\ using the quad bike. On doing that, you trigger the appearance of a guard on a lower level that drops some MP5 Clips. To get down there, approach the rocks and stand in the corner facing the back side of the rubbles. Take a running jump to grab it and pull up to slide on a flat ledge (as shown in this screenshot). Jump to grab the ladder and climb to the bottom. Climb on the wooden walkway on the left, jump the gap (over the crashed train) and jump over the rocks on the left (as shown here). Drop to the metal platform, kill the guard and pick up his Clips. Then drop into the water.] Drop into the water. Get the three trines of Harpoons at the bottom and surface if you want to. Then swim through the tunnel and get some more Harpoons on your way (or the Harpoon Gun if you do not have it). Surface and climb out of the water. The chime signals the 3rd Secret. Walk to the end of the path and be careful not to fall into the lava pits. Jump to the next path on the left and then jump over the slide. Slide down the ramp and jump at the end pressing Action to grab the ledge ahead. Pull up and draw weapons. Turn left and kill the bird that flies from ahead. Then jump to the next ledge and take a running jump to the bigger ledge beyond. Take a running jump to the square ledge in the corner and turn around to kill another bird. Make sure you stay close to the wall or it will push you off the edge. Having the way you came to your back, stand against the wall and jump up to grab the edge above. Traverse to the left until you start seeing a flat ledge at the end. Hang two squares away from that ledge (a redish triangular tile should be above you), pull up and back-flip to the path behind. Pick up the Large Medi Pack and continue to the end of the path. Draw weapons and wait for a bit. A bird will show up from the right, so kill it. Then jump to the ledge on the right where another Large Medi Pack is. Turn around, kill another bird and pick up the Medi Pack. Slide into the water and swim back to the flooded pit, then through the opening on the left opposite the ladder to end the level. Controls of the quad bike – To ride the bike, stand in front of it and press Action. To move forward press Action. To move backwards press the Jump button. To dismount press the Roll button along with the left or right direction key. For extra boost, stay still and press the Sprint button which is the break. Keep pressing the break and press Action to rev the engine. Then release the break and go.
|
||
| « Level 2: Willard's Lair | Index | Level 4: Sleeping with the Fishes » |
| We would like to thank Nicky for her help. Many parts of this walkthrough would not have been written without her participation. | ||
Tomb Raider Expansion: The Lost Artifact Walkthrough & Game Guide © 2000-2007 www.tombraiderhub.com |
||