Tomb Raider 3 Expansion (Gold): The Lost Artifact Walkthrough & Game Guide
Level 5: It's a Madhouse!
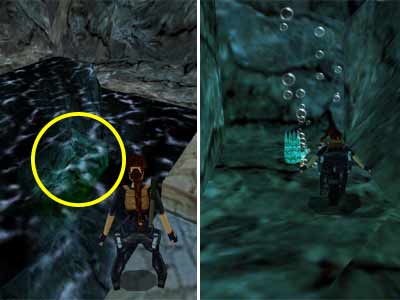
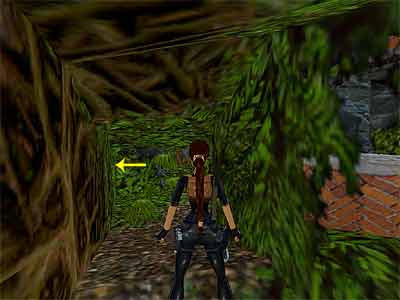
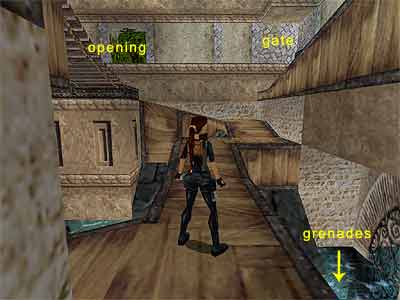
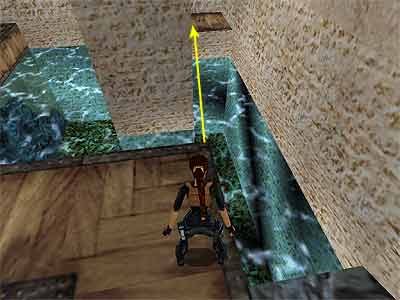
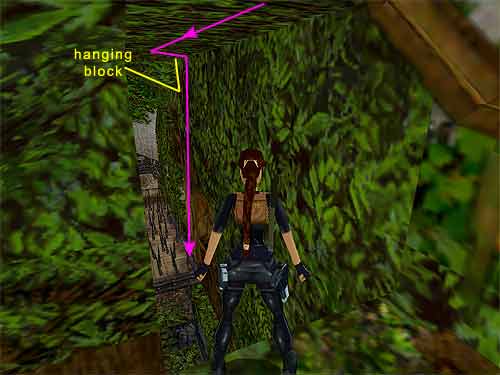
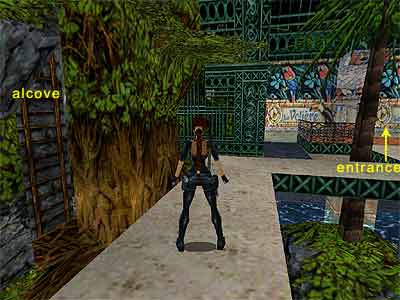
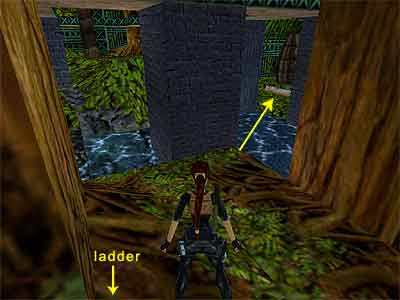
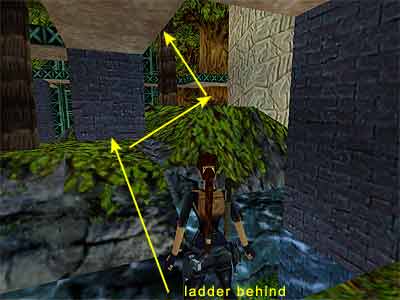
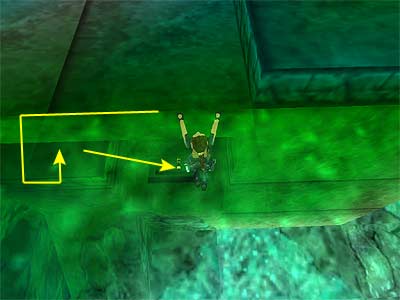
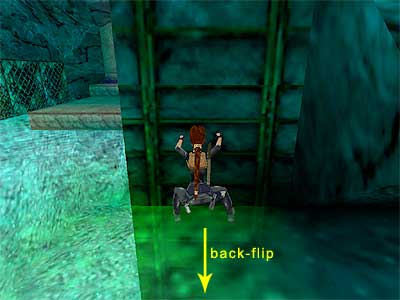
Swim away from the raft until you can surface. Locate the greenish underwater area on the left hand side. It seems that there is nothing down there, but if you light a Flare, you will be able to spot the Hand of Rathmore (see this screenshot if you are having troubles locating the Hand). When you get it the trapdoor at the top of the ladder opens. Climb on the steps, pick up the Flares and climb up the ladder. Area with tables – Enter the opening on the left and pick up the Shotgun Shells from the barred window ahead. Then go down the steps on the left where you will find some more (or the Shotgun if you do not have it). When you pick up the last Shells, the camera shows a car driving down a street. This street is exactly behind those barred windows and you will go there for a Secret later in the level. Return back to the previous courtyard and go to the left, then through the opening on the right. To the left, behind the palm tree and in front of the cage with the tiger, you will find two sets of Shotgun Shells. Pick them up and go up the steps opposite the entrance that two signs "C'est le zoo ici!" flank the doorway. Draw weapons and deal with the two tigers that attack. (Tip - To deal with the tigers with no problem, run up the steps, and as soon as they appear, run quickly to the left, where there is a low wall with a lantern and a blue striped awning. Jump to grab the awning and pull up. You have to be very fast, so as to not get bitten or pushed away by the tigers. From up there, you can shoot and kill the tigers at your ease. If they run away, just hang from the edge of the awning to lure them back and finish them off.) There is a closed door on each side of the passage and both require a key. Go to the far left and climb on the roof with the lantern. Drop behind the greenery on the right and pick up the Zoo Key. Climb back up and use the key to open the right hand door (La planete des Signes). "La planete des Signes" gate – Go through the opening and down the stairs to reach the next room. Use the switch behind the ledge to open a gate on the left hand side of the area; go there. Before entering, pick up the Shotgun Shells in front of the bars. When you do that, the camera shows two monkeys behind the bars and one of them grabs a Small Medi Pack. Go through the gate and crawl through the opening. Pick up the Large Medi Pack and return back. Go to the right where a brick block is and pick up the Flares. You cannot go behind the greenery (you will do in a while), so the two tigers cannot attack you. Climb on the block and then climb into the maze above. The maze – It is not difficult to move around and there are no pick-ups inside the maze. Only the two tigers you saw behind the greenery will attack. When you climb from the brick block, there are two ways you can follow – left and right. Choose the left to proceed and kill the two tigers. You can take advantage of the various low ledges to kill the tigers from safety. Now keep the wall on your left, passing all the openings you meet on your right and climbing on the low ledges. You will eventually reach a T-junction. Go to the left and down the ramp to reach the area behind the greenery. Follow it as it goes to get inside the tiger's cage. Pick up the Uzi Clips (or a pair of Uzis if you do not have them) and return back to the entrance of the greenery area. 1st Secret – Facing the ramp you came from, look for an opening on the left, covered by the leaves (as shown here). When you go through it, you can hear the chime signaling the Secret. Climb up the two blocks and then climb on the ledge to the left to exit. The second car drives down the road. Drop down, pass the statue and go down the road. There is a Small Medi Pack on the right hand ledge and if you do not get it quickly, the monkey will and you will need to kill it, because it does not drop it anywhere. Moreover, it climbs on a block covered by railings, which means that you cannot reach it. So, run down the road without stopping and as you approach the ledge with the Medi Pack, instead of climbing up to it, jump on it, and you will most probably get to it before the monkey does. Continue down to the end of the street and pick up the Large Medi Pack from the alcove on the left and the three sets of MP5 Clips from the ledge on the right (or the MP5 Gun instead of one of the sets if you do not have it). (Note – When you pick up the Clips in the corner, you get a view of the area down there. Do not try to reach that place because it is a long drop down. You will get there later. If you want to try from here, see this page.) Go up the street, but before leaving, use the switch behind the statue to open a trapdoor in front of another statue in an area you have not been in yet. This gives you the access to the 3rd Secret, so make sure you use the switch. Then return back to the area behind the greenery. Go up the ramp and enter the passage. Pass the first opening on the right that leads back to the maze (from where you came) and go to the end to enter the maze from another point. Quickly jump onto the low ledge in the corner and kill the tiger that attacks from the right. Now follow the maze again, turning left at the junction. Pool with wooden walkways – When you climb on the wooden walkway, the camera shows a gate opening and two monkeys getting outside. They will most probably grab the Aviary Key #1 and the Small Medi Pack from the walkways before you do, so you need to kill them in order to get them. Be careful of the gate though. It closes when you reach the far side of the area, so make sure you kill them quickly before either passes through the gate. If the monkey that carries the Key ends behind that gate (or you do not want to kill the monkeys at all), you can get the Key later, because you will need to go behind that gate anyway. There are four pairs of Grenades into the pool. Go where you got the Medi Pack and locate the rocky slides nearby. Slide into the pool and swim through the opening. Just in the alcove on the right you will find the first pair. Now follow the other side of the underwater tunnel, passing beneath the wooden walkway. Swim through the left hand opening and get the second pair. Exit and swim forwards past the white columns. In the alcove on the right you can find the third pair. Here you will find a low rocky ledge where you can climb out. Do it, go up the ramp and as you take the first turn on the left, take a look on the right and notice the part of the pool which is separated from the rest (as shown here). Jump in there, get the fourth pair and climb out of the water. There are more Grenades in an alcove exactly beneath the entrance. To get those, make your way to the lowest walkway and facing the alcove, stand in the corner and take a running jump to pass just on the right of the column and grab the edge of the alcove (as shown here). Area with wooden walkways and spikes – Go up the walkways and through the opening on the left of the gate. Drop to the branch and walk to the edge on the right. If you do not have your weapons drawn, the camera will show a tiger lurking below. Here you can do either: • Jump up to grab the vines and traverse forward until you see a triangular ledge hanging from the ceiling. Approach it, turn right, hang against the wall and release to drop into the spikes, losing a small percent of health (see here to get oriented). Side-step to the left and climb into the opening. • Grab the vines and traverse forward, then left past the hanging ledge, following the vines to the end. You end up hanging above a slide. Turn right, drop to the slide and jump to grab the crevice. Shimmy to the very right and drop down just next to the spikes. Climb into the opening. Once you enter the passage, quickly draw weapons because the tiger will attack. You may want to enter the passage with the steps in order to have some space to move. From this passage, look for an opening that does not overlook the spikes. Go through it and follow the wooden walkway. Jump up to grab the upper one and pull up. Take a running jump to the alcove with the Flares on the left, get them and take a running jump back to the walkway. Walk through the spikes on the left until you reach a pit with a climbable wall on the left. Use that wall to enter the alcove and get some Uzi Clips. Make your way back to the passage with the steps. Go to the top and use the switch to open the gate. A monkey will try to grab a Small Medi Pack from the brick block and if you are not quick you can either shoot the monkey or follow it to see where it will drop the Medi Pack, back in the area with the spikes. From the brick block, go through the opening on the right. If you did not kill the monkey before, you will see it running towards a gate. This is a hint. Behind this gate is the area that includes the level's 2nd Secret and you will open it in a while. For now, go through the opening on the right and climb on the ledge to the left. Use the zip line to ride over a spiked pit behind the slide and end up on an island. Rocky island – Do not jump into the water, because the piranhas will kill you. Pick up the two Rockets around the pillar and drop into the small pool to get the Aviary Key #2 (this will give you the access for the final Secret). Piranhas will attack from nowhere, so quickly climb out of the water, feeding Lara with Medi Packs if necessary. There are also three monkeys around the area that were carrying a Medi Pack in their mouth whilst you were still on the zip line. To get the three Small Medi Packs, go through the gate on the right (if the entrance is to your back) to return back to the area with the spikes. The Medi Packs are in the same alcove, where the other monkey dropped the previous Medi Pack, just to the left after going down the first steps. 2nd Secret – When you exit the spiked area, go up the steps on the left. Pass the gate you opened with the switch before and go through the opening on the right. The gate is now open and inside the courtyard you will find a Large Medi Pack and two sets of Desert Eagle Clips (or the Desert Eagle Gun instead of one of the sets if you do not have it). Return back to the island using the zip line again or the same way you came through the gate. The gate at the far left opens as you approach and it takes you back to the area with the wooden platforms, in case you have missed the first Aviary Key. So, make sure that at this point you have both. Use the switch on the block to the left of the pillar to open the gate behind. This is timed, so hop back once, take a standing jump on the block and sprint through the gate. You are back in the room next to the greenery area, so go through the opening straight ahead and up the steps to return outside. La Loviere gate – Use one of the two Aviary Keys to open the gate and go through it to enter the Aviary. Cross the walkway and as you take the first turn on the right, turn around and kill the vulture that flies behind. Then drop to the greenery where three trees are. Behind the middle one you will find a ladder (as shown here). Climb up it and pick up the Shotgun Shells, the Desert Eagle Clips and the Uzi Clips from the short passage. Climb down the ladder, turn around and go to the right hand side. From the opening between the blue brick wall and the tree, take a running jump to the opposite landing (as shown here). Pick up the Shotgun Shells from the ledge on the right, beneath the awning. Draw weapons and turn to face the opposite awning. Lara will aim at a vulture that is sitting on it. Kill it now before it surprises you later. Then take a running jump back to the greenery with the three trees the same way you came. From the middle tree, take a running jump to the island and then jump to the next flat part on the right (as shown here). Climb on the walkway and go around it to the end. Turn around and kill another vulture that flies. Then jump to the square ledge with the Small Medi Pack. Drop off the ledge and onto the small hill with the palm tree. Turn around, walk to the edge and jump up to grab the ladder. Climb to the top and go to the right. Jump to the small triangular ledge on the left and then jump beneath the archway, pressing Action to lower Lara's arc. Pick up the Shotgun Shells and continue to the other side (crawl if necessary). From there, take a running jump to the white pillar beneath the zip line. Turn around and kill the vulture that flies from behind. Before riding the zip, take a running jump to the opposite greenery. At the top, pick up the Grenades (or the Grenade Launcher if you do not have it). Then jump back to the white pillar. (Note about the 3rd Secret – In order to get the Secret, you need to have done two things: opened a trapdoor using a switch in the area where you got the 1st Secret and collected the second Aviary Key. If you have forgotten either, you can still go back. Once you use the zip line, you will not be able to come back.) Ride the zip line to get to the next area. If you do not have the Aviary Key or have not opened the trapdoor from the area with the 1st Secret, you cannot go after the 3rd Secret, so proceed to the right and drop through the hole. Carefully go down the steps and jump over the gap with the toxic liquid at the bottom. Pick up the Flares and continue through the opening. Beyond, you may see a shinny thing. This is a Rocket, but unfortunately it is from the final Secret. Continue to the left to reach an area with floating bodies. Jump to the transparent platform and place the Hand of Rathmore in the hole of the body's chest to end the level. 3rd Secret – If you have got the Aviary key AND opened the trapdoor from the area with the 1st Secret, you can go and claim the level's final Secret. Use the Key to the keyhole to the side of the statue to open a gate that you will go through now. Continue past the hole and jump into the passage on the right. Follow it to reach an area with another statue. Drop through the hole and jump the gap. Pick up the Flares and jump the next gap. Pick up the two Rockets. Notice the ladder on the left? Stand with the ladder to your back and hop backwards to grab the edge of the ledge. Traverse to the left if necessary, release and grab the ledge below (as shown here). Pull into the crawlspace, turn left and crawl backwards to drop in the alcove. Pick up the Rocket (or the Rocket Launcher if you do not have it) and take a running jump to grab the ladder on the other side. Climb up until Lara's feet are above the green transparent surface (as shown here). Back-flip to the ledge you were before. Go to the other side of the ledge. You can see a couple of lizards running around in the next area. Drop to the platform below and kill them from above. Then slide down and kill a third lizard that comes down the blocks on the left. (Note – If you have completed the Adventures of Lara Croft, you should know that the lizards breathe a poisonous liquid and you need to take a Medi Pack in order to be healed. Be careful because if you get too close they may bite you. Back-flipping and/ or side-jumping whilst shooting keeps you from getting hit by their lethal poison.) Pick up the two Large Medi Packs from the low square ledges and draw weapons because two more lizards attack. If you get poisoned by their breath, do not be hurry to heal yourself. If you have an estimated percent of health, you can make it to the end. Climb up the blocks from where the other lizard came and drop into the room with the floating bodies. Go around it to reach another room with floating bodies. If you want all the pick-ups, go to the left and climb on the upper part of the cave. Go around the pillar and pick up the Flares. Then return to the previous floating bodies' room and jump to the transparent platform. Place the Hand of Rathmore in the hole of the body's chest to end the level.
|
||
| « Level 4: Sleeping with the Fishes | Index | Level 6: Reunion » |
| We would like to thank Nicky for her help. Many parts of this walkthrough would not have been written without her participation. | ||
Tomb Raider Expansion: The Lost Artifact Walkthrough & Game Guide © 2000-2007 www.tombraiderhub.com |
||