Tomb Raider 3 Expansion (Gold): The Lost Artifact Walkthrough & Game Guide
Level 6: Reunion
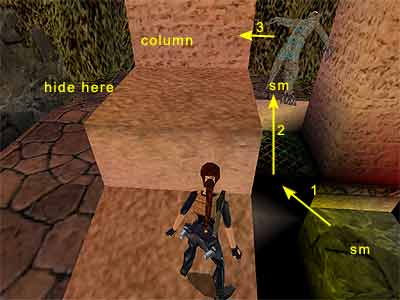
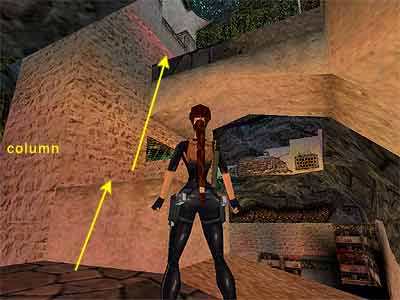
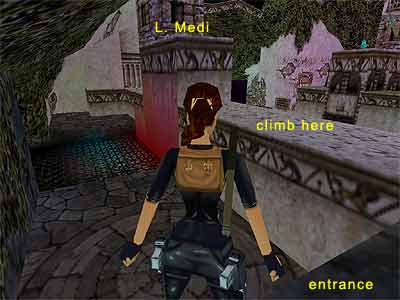
As soon as the level begins, side-flip to either direction to avoid the rolling meteorite from behind. Go around the pit and approach the pool with the toxic liquid. There is an invisible walkway at the middle where you can walk on and pick up the Rocket and Grenades. When you get the Grenades, do not proceed further, because the walkway stops just beyond. It does not touch the wall, so if you go on you will end up dead in the toxic pool. There is a same invisible walkway on the other side of the area, but this time the meteorite starts rolling as soon as you step on it. To avoid it, turn with the walkway to your back, hop backwards to trigger the meteorite and then run away, turning left or right. Or, step on the walkway facing the meteorite, and it will start rolling towards you. Immediately hop back and side-flip to either left or right without hesitation. Now you can go and freely get the three pairs of Grenades (or the Grenade Launcher instead of one of the pairs if you do not have it). Again, do not proceed further after grabbing the last pair of Grenades, because you will fall in the toxic pool. There is an opening on each side of the pit. First, climb through the one that has no barred windows on the sides. You should recognize the place from the end of the previous level. Pick up the Flares from around the pillar and return to the pit. Now go through the other opening and pick up the Flares. Climb on the ledge and get some MP5 Clips. Two guys will show up here, each one running up the steps on the side of the room. They will go up the steps, then come down from the central staircase. So, take care them before they do. They exited a small room, one on each back side of the area that includes a Small Medi Pack. When you pick up the two Small Medi Packs, go up the steps and get a Rocket behind the pillar on the right hand side. Pit with invisible platforms – Approach the pit. The floating bodies do not come to life, so move freely. Light a Flare to locate the invisible platforms that will help you get across. When you reach the last platform, just before the wide opening, make sure you jump whilst pressing the right direction key, or you will slide close to the swinging burner. Pick up the Flares on the right and go to the left of the ledge. When the burner moves to the right, approach the edge and take a standing jump to the opposite square ledge. Fighting Sophia – When you land on the square ledge, the camera shows Sophia Leigh climbing on the ledges. If you have played and completed the Adventures of Lara Croft, you should know Sophia from the City level. Again, she is throwing energy bolts through her scepter and if you try to approach her, the bolts will kick you back and may throw you into the toxic liquid pits. The pattern is the same: avoid Sophia, because you cannot kill her, until she reaches the point where she is vulnerable. Jump the gap to reach the next ledge and follow the way as it goes to the right. Turn again right and climb on the block where the Small Medi Pack is (as shown here). Then jump into the opening on the left where the floating body is and vault onto the next ledge with another Small Medi Pack. Immediately go around to the left to hide behind the column (like in this screenshot). You may have noticed a Large Medi Pack, close to where Sophia started. If you badly need that, climb on the low ledge next to the column from where you are hiding now. To avoid her bolts, wait for her to power up her scepter. This is a dead time and it gives you the seconds to climb on the ledge. This will make Sophia move upwards, leaving the area clear for you to move. Carefully make your way down, jump to the central platform and grab the Medi Pack. This will cause one of Sophia's men come down, so either kill him or jump back and ignore him. Return to the column you were hiding behind before, climb on the low ledge and then climb onto the bridge above (as shown here). Vault onto the ledge to the left and move around to the left to enter a cave with a Large Medi Pack. A mutant will attack, so take care of him and pick up the Medi Pack. Then exit and go to the other side opposite the cave. Another mutant is lurking there, so kill him. There is also a small pool of clear water on the left side of the switch, in case this or any of the mutants that follow set you on fire. As you approach the switch, a meteorite falls and starts rolling. There are two steps opposite the switch and a Large Medi Pack at the bottom. If you want all the kills, move to the left (as you face Sophia) and kill one more guy. The switch opens the two gates alongside. Inside four mutants will attack – three from ahead and one from behind. Kill them and pick up the Small Medi Pack one of them drops and one more plus some Flares in front of the barred window. Go through the opening on the left and carefully pass the swinging burner. Use the switch to open the gate at the top of the ladder, climb up the ladder and be ready for the final battle. Final battle – Climb on the rocky ledge to enter the new area. Miss Leigh will climb and stand to the left of the block where the Hand of Rathmore is. Sophia must climb on this block because only then she will be vulnerable. To make her do that, climb on the wall ahead (the wall as shown here). A meteorite will fall and if you want, you can climb on the upper ledge and grab the Large Medi Pack. Then drop back down and pick up the Rocket at the end of the passage. There are more pick-ups behind the wall that you may or not need: two Small Medi Packs and six Rockets (or, if this damn fate did not allow you collect the Rocket Launcher until now, you will find it here instead of one of the Rockets). If you follow this walkthrough, you will not need them. Stay close to where you got the last Rocket (as shown here) and equip your Pistols (yes, your Pistols). This ledge is high enough and you can aim at Sophia. She will start shooting bolts, but they cannot reach you. When she raises her scepter in order to power it up, quickly shoot her, before she does that. If you hesitate just for a second, Sophia will just hump and kneel and then shoot you again. In that case, wait for her to raise her scepter again. Once she is dead, you can go and claim the pick-ups, although you will not need them. Then go where Sophia was standing and pick up the Hand of Rathmore. On doing that, a door at the back opens. Go through it and slide into the pool below. Climb out of the water and into a room that you should recognize if you got the 3rd Secret of the previous level. Slide down to the shore and approach the air balloon to end the level and the game.
|
||
| « Level 5: It's a Madhouse! | Index | |
| We would like to thank Nicky for her help. Many parts of this walkthrough would not have been written without her participation. | ||
Tomb Raider Expansion: The Lost Artifact Walkthrough & Game Guide © 2000-2007 www.tombraiderhub.com |
||